Kevin Hayler: Professional Wildlife artist, author, and traveler.
A brush stamp is a recurring shape, pattern, or texture that repeats along a drawn line. It can even be an image. It can be enlarged, reduced, and randomized to your heart’s content, but you must do it correctly. In this post, you’ll learn how to make a stamp brush in Procreate the right way.
Open a square canvas > draw a black shape, tap the wrench icon > ‘Add’ > ‘Copy Canvas’. Tap the brush icon > ‘+’ sign. In Brush Studio tap ‘Shape’ > ‘Edit’ > ‘Import’ > ‘Paste’. Invert the image with a two-finger tap > Click ‘Done’. Tap ‘Stroke Path’ > Spacing 100%. Go to ‘Apple Pencil’ > set Opacity 0%. Click ‘Done’.
Now I’ll show you how easy it is, step-by-step with pictures.
What are we waiting for? Let’s go
Disclaimer: When you buy something via my affiliate links I earn from qualifying purchases and sometimes earn a commission, at no extra cost to you. I am an Amazon Associate among others. I only recommend trusted sites.
How to Make a Stamp Brush in The Procreate App
1. Make a Square Canvas
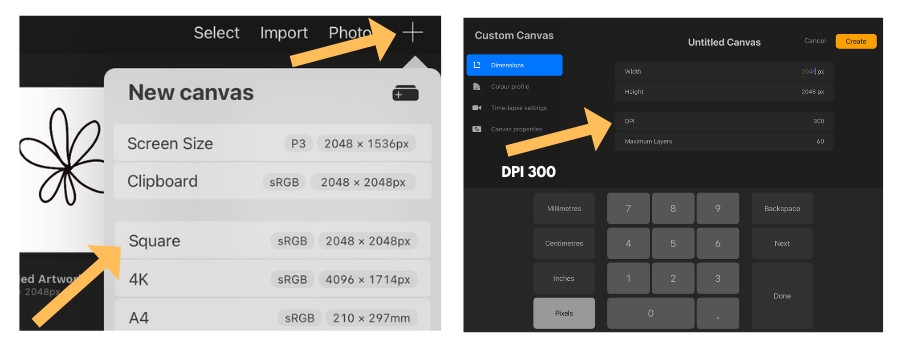
Start with a square canvas. Open the Gallery and tap the Plus symbol at the top right corner of your screen. A drop-down menu offers you some presets.
N.B. Making a stamp doesn’t work with a rectangle because the image warps.
I checked the resolution of the default Square setting sRGB 2048 x 2048, and noticed it was only 132 DPI. If you intend to print your design you should ensure that your canvas is set at 300 DPI.
If you swipe the default Square setting to the left, you’ll see a Delete button in red and a gray Edit button. Tap the Edit tab. A new Custom Canvas page opens where you can change the DPI setting to 300DPI. Tap Save.
Alternatively, make a new canvas by tapping on the icon at the top right, it looks like a black folder with a white plus sign. The same Custom Canvas page opens up.

Enter your dimensions, 2048 Width x 2048 Height, and set the DPI to 300. Click the Create button and your canvas opens in the Procreate interface (drawing pad).
Set the color of your brush to Black. Tap the Color circle at the top right of the screen and use the Disc or Classic color picker. Alternatively, you can tap Value and set the Hexadecimal to #000000.
2. Pick a Brush
Click the brush tool (Paintbrush icon) and choose an existing brush from the Brush Library. There are over 100 default brushes available so to make things simple I clicked Painting in the dropdown brush menu and selected the Round Brush, the first on the list.
Adjust the settings with the two slider settings on the left of your screen. I set the Brush Opacity slider to max (bottom slider), and the Brush Size to 16% (top slider).
3. Draw Your Stamp (Shape Image)
Time to draw your design. For the sake of simplicity, I’ve drawn a cute star with quick shapes. You’ll take more care. It’s a good idea to take some time and get everything right before you make a stamp brush.
Make sure you fill the canvas space. This will give you the highest-resolution image.
To align the image accurately, tap the Transform icon at the top left, it’s the diagonal arrow within a circle. At the bottom left of your screen, tap the Snapping tool (lightning bolt in a circle) and toggle the Snapping setting to ON.
Move the selection box containing your stamp shape and center your image perfectly using the vertical and horizontal guidelines.
4. Copy Canvas and Paste it into the Shape Editor
Proceed by following this sequence:
- Tap the Wrench icon at the top left of your screen this opens your Action menu
- Click the Add icon in the top row
- Scan down and tap Copy Canvas
- Tap the Brush icon at the top right to open the Brush Library
- Tap the Plus sign at the top right to open the Brush Studio

- Tap Shape in the side menu, to the left of your screen
- Above the white circle, tap the Edit button. This opens the Shape Editor
- Tap Import, at the top left
- Tap Paste in the dropdown menu

When I followed this sequence originally, I was surprised to notice that my copy was dark gray. My brush shape was not a true black. Initially, I thought it was my fault, but after experimenting and getting nowhere I contacted support and this is what they said:
“Brush Studio doesn’t use pure black or white values but rather operates in different greyscales. If you look at the shape source of a default Procreate brush, you will notice the same shade of grey. You will need to use black if you want a fully opaque brush at the end, but it will not be pure black within Brush Studio.”
Interesting. Not a big problem, but worth knowing.
5. Invert Your Image
Let’s continue:
- Use a two-finger tap to inverse the image.
- The white background becomes black, and the black image becomes white
- Tap Done

6. Adjust the Brush Stamp Settings
You’ll return to the Brush Studio menu and your Procreate brush settings:
- Tap Stroke Path at the top of the side menu
- Under Stroke Properties set the Spacing slider to 100%
- Slide Jitter to 50% – ish, if you want a random pattern
- Tap Taper > Opacity to Max (Optional setting for your pen pressure)
- On the left side menu scan down to tap the Apple Pencil
- Under Pressure, set the Opacity slider to 0%. All your stamps will now be at maximum opacity.

We aren’t finished yet:
- Tap Properties in the left menu
- Under Brush Behaviour set the Maximum size to Max in the slider if you want the largest possible shape image
- Slide the Minimum size to between None and 10% if you want tiny stamps
- Move up to Brush Properties and slide the Preview setting to about 10%
- Toggle Use Stamp Preview to ON
- Tap Done

You’ll be taken to the Brush Library where your own stamp brush is highlighted with your list of brushes.
You got there.
7. Test Your New Stamp Brush
Let’s use your new stamp brush:
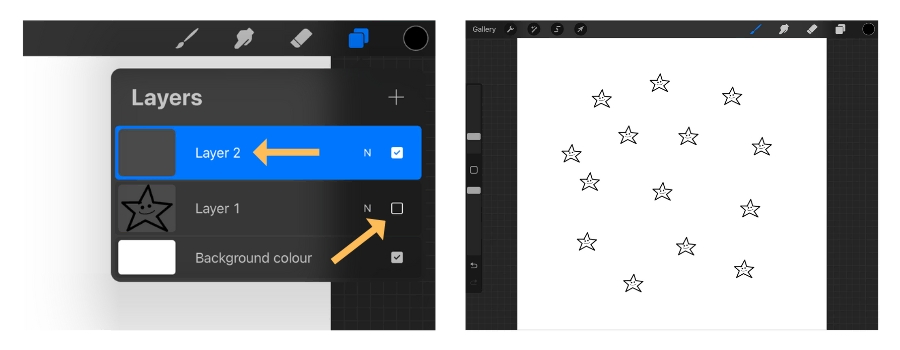
- Tap your Layer icon on the top right (Two Overlapping Squares)
- Tap the Plus (+) Symbol to open a new layer (Layer 2)
- Uncheck Layer 1, just to see what you’re doing
- I set the Size slider on the left to 5% to see what size it would make
- Draw on the page and tiny stars appear. Perfect

8. Tweak Your Shape Settings
Now you have a clear idea of what happens. It’s time to play with your shape settings:
- Clear Layer 2 with a three-finger scrubbing motion (or undo)
- Change the color with the Colorpicker tool
- Change Opacity with the left-hand slider (bottom)
- Change the Size with the left-hand slider (top)

9. Experiment With The Preview Panel
Now try a couple more Procreate settings:
- Tap the Paintbrush icon and open the Brush Library again
- Tap on your new brush to open the Brush Studio
- Tap Shape
- Under Shape Behaviour experiment with Scatter, Rotation, Count, and Count Jitter settings

There’s no need to go back to your canvas, simply draw on your preview panel on the right of your screen to see the different effects. It’s the easiest way.
Remember this is a new brush and multiple stamps will follow the line of your brush strokes. If you tap the screen, however, you can paste a single stamp, one at a time. To have the most flexibility, open up new layers as you work.
Make a Stamp Brush from an Image
As ever, there is more than one way to make your brush stamp. You can follow this sequence:
- Draw your shape as before
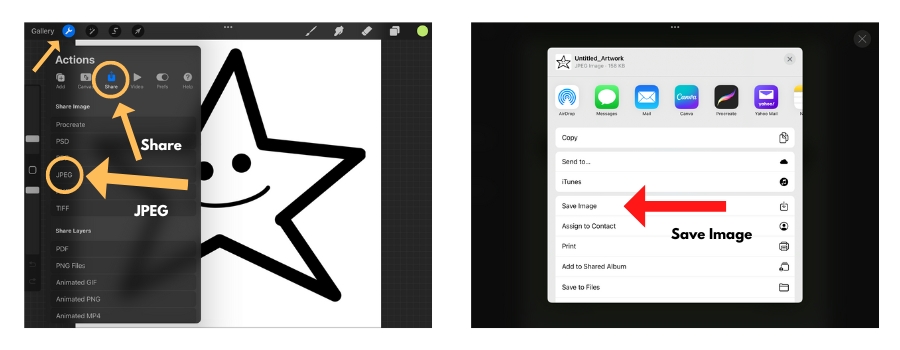
- Tap the Wrench tool to open the Actions menu
- This time tap the Share icon
- Tap JPEG to open the new menu
- Tap Save Image to save it to your camera roll

That’s saved the image let’s move to the next step:
- Tap the Brush icon at the top right
- Gently swipe one finger down on the Brush Library list to reveal the blue Plus symbol at the top
- Tap the Plus sign to open a new folder in your library. It will say Untitled set
- Change the name. I’ll call mine my shape stamps
- Tap the Brush Library Plus Symbol at the top right

And the next:
- Tap Shape in the side menu, to the left of your screen
- Above the white circle, tap the Edit button. This opens the Shape Editor
- Tap Import at the top left
- Tap Import a Photo in the dropdown menu
- Tap your image to open it in the Shape Editor

Proceed as before:
- Tap your image with Two Fingers to invert the image and tap Done
- Tap Stroke Path at the top of the side menu
- Under Stroke Properties set the Spacing slider to 100%
- Slide Jitter to 50% – ish, if you want a random pattern
- Tap Taper > Opacity Max
- On the left side menu scan down to tap the Apple Pencil settings
- Under Pressure, set the Opacity slider to 0%. All your stamps will now be at maximum opacity.
You’re all set to go again. Use this method to import any image but it only works with monochrome. A color image will be in Grayscale.
How to Make a Stamp Brush: Final Thoughts
This is one way to create repetitive patterns. It’s useful to know and apply in certain circumstances. You can also Copy and Paste an item, use the Clone Tool, and Duplicate elements, and layers in Procreate.
Check this post for more: How to Duplicate in Procreate: Copy and Paste, Cut and Clone
It’s an easy process to create your own collection of Procreate shape brushes, if somewhat longwinded.
It’s time-consuming enough to ask yourself why you would want to create your own Procreate stamp brushes when pre-made bundles of stamp brushes are readily available for a few dollars.
You might answer for creative reasons alone, and that’s fair enough, but you might want to consider making your own brushes and selling them yourself!
Is your brain whirring? You can make your own custom brushes and sell them too. Why not?
If you were going to make your brushes anyway you can cash in on all the effort. You only have to sell a few bundles to pay for your time, and you never know, you might sell hundreds.
Check out sites such as these:
You can buy brushes and/or sell them.
What are you waiting for?
These are useful Procreate posts that will help you out:
- Is The Procreate App Worth it For Beginners? Get the Facts
- Is it Worth Buying an iPad for Procreate?
- How to Add a Grid in Procreate and Improve Your Drawings
- How to Undo in Procreate: Plus Redo Gestures (2023)
- How to Change Layer Opacity in Procreate: Step-by-Step
- How to Make Straight Lines in Procreate: Step-by-Step
- How to Use the Symmetry Tools in Procreate: Step-by-Step
- Do You Need an Apple Pencil for Procreate? I Found Out
- Does Procreate Work on iPad Mini 5? What You Need to Know
- How to Use Layers in Procreate: 15 Essential Tips and More
- How to Print From Procreate: Your Step-by-Step Guide
Before you go, take a look at this Procreate for Beginners course. I bought it myself to get started. It covers the basics and it’s a bargain

Check out my Domestika Review here: Is Domestika Worth It? The Pros and Cons for Artists and Designers
I wrote this guide to help artists, like you, sell their art from a market stall
These are art business-related posts:
- What Kind of Art Sells Best? All The Secrets Revealed
- Is Print on Demand Worth it? The Pros and Cons for Creatives
- Are Online Drawing Courses Worth it? I Chose 5 of The Best For You!
- Can You Copy Art and Sell a Painting of a Painting? I Found Out
- Is Selling on Etsy Worth it? Pros and Cons for Artists and Crafters
- 25 Platforms for Artists to Sell Their Art Online and Make Money
- 19 Ways to Make Money as an Artist Online and Off: No Fluff!
- Drawing Ideas for Adults: 120 Cool and Easy Things to Draw
- Is Redbubble Worth it? Pros and Cons For Artists and Designers
Pin For Later


Hi, I’m Kevin Hayler
I’ve been selling my wildlife art and traveling the world for over 20 years, and if that sounds too good to be true, I’ve done it all without social media, art school, or galleries!
I can show you how to do it. You’ll find a wealth of info on my site, about selling art, drawing tips, lifestyle, reviews, travel, my portfolio, and more. Enjoy


