
Finding animals to draw in the wild takes time, money, and a lot of luck. It’s a luxury that most of us can’t afford.
Yet, there is an obvious alternative. Zoos, sanctuaries, and rescue centers solve this problem. You get close-up views of your chosen subjects and the chance to take plenty of photos for reference. It’s the easiest way to study animals, gather material, and get work done.
In this post, I’ll show you how to use captive animals as drawing subjects, share some tips for sketching and photographing them, and walk you through a few of my own drawings to show how I work.
If that sounds good, let’s jump straight in.

Why Draw Zoo Animals?
Drawing wildlife from life is ideal, but let’s face it, it’s impractical. Wild animals are unpredictable, usually hidden, and constantly moving. Even if you spot something, it’s gone in a flash, the pose is wrong, or the light is bad.
Zoos give you time to observe animals properly. You can study their anatomy, sketch their movements, and take as many photos as you need. Instead of waiting hours for a lucky sighting, you can start gathering material straight way.
The biggest advantage is convenience. You have access to multiple species in one place, giving you plenty of options. If one animal isn’t cooperating, there’s always another one to sketch.
That said, not every subject will be ideal. Many animals will be asleep, turned away, or stuck in an uninspiring enclosure. Some won’t hold a pose long enough to be useful.
If that happens, don’t waste time, move on and come back later. With so many options at hand, you’re never short of something to draw.

The Challenges of Drawing Zoo Animals
Zoos make it easier to find subjects, but they come with their own set of problems. Animals don’t pose on command, enclosures can be awkward, and distractions are everywhere.
1. Animals Don’t Stay Still
Even in captivity, animals are rarely motionless. They pace, turn away, or suddenly disappear into their shelter just as you start drawing. Quick gesture sketches can help, but if an animal is too restless, take photos and work from them later.
2. Bad Viewing Conditions
Glass reflections and glare spoil your shots, plus glass screens are usually dirty. Bars and fences, and chicken wire get in the way too.
I look for open enclosures with a clear views of the animal. I dislike raised platforms, on the whole. I prefer to photograph animals at ground level.
Using a flash is usually a bad idea. The light bounces back off the glass and highlights wire fencing.
Use a long lens and zoom in on the subject to blur the wire. That works well if all you require is a reference photo, it’s not so good if you want a great photograph
3. Crowds and Noise
Visitors can be a distraction, especially at feeding times or in popular exhibits. If you’re sketching, try to find a quiet corner. Some zoos have benches or shaded areas where you can sit comfortably out of the way.
Avoid weekends and school holidays. Go mid-week for some peace and quiet.
If you want to try sketching from life you’ll need some space. I find onlookers are curious and mostly very polite, but there are always one or two people with no social graces and you should take that into account.
4. Artificial Settings Can Be Misleading
It’s easy to assume that an animal’s surroundings in a zoo are a reflection of its natural habitat, but this is often far from the truth. Enclosures are designed for practicality, and aesthetics, not always for authenticity.
Be selective with backgrounds. Either modify what’s there to make it more realistic or leave it out altogether.
5. Captive Animals Can Look Unnatural
Some zoo animals are overweight, unfit, or lethargic, often due to limited space and an easy food supply. A predator that would normally be lean and alert in the wild might appear soft and uninterested.
Avoid drawing an animal without any ‘oomph’. Half closed eyes or a slouched posture doesn’t make for a compelling work of art. Instead, look for moments when the animal is engaged with its surroundings; feeding time is best.
Despite these challenges, zoos remain one of the best places to find reference material. With the right approach, you can work around these issues and come away with great sketches and photos to use in your drawings.

You’ll enjoy this post: 6 Realistic Elephant Drawings in Pencil
3. Look for Expressive Poses and Behavior
A good drawing isn’t just about accuracy, it’s about storytelling. The best animal studies show movement, emotion, or interaction, making the viewer feel like they’re witnessing a real moment in life.
Zoos give you the chance to capture expressive poses and natural behavior, but you have to plan for it.
Feeding times are the best opportunities to see animals alert, active, and adpt interesting poses. If you want to see movement and personality, check the zoo’s schedule and time your visit around the key exhibits.
For a commercial artist, like myself, saleability matters. Some animals sell better than others, and nothing sells better than mother-and-baby scenes of iconic animals.
If a zoo has a young animal, that’s your priority.
Baby animals play, feed, and explore their surroundings, while their mothers stay close, creating a natural composition. It’s everything you need for a winning image.
Lighting is another factor, but it’s not a deal-breaker. Early morning and late afternoon give the softest light, but overcast days work fine too. Rain is the real problem.
That said, as an artist, you have plenty of freedom to adjust lighting, tweak shadows, and add missing elements later. What matters most is capturing an engaging moment.
5. My Process: How I Draw Zoo/Captive Animals
Zoos are a great resource, but creating a strong drawing takes more than copying what’s in front of you. It’s about making choices, choosing the right pose, adjusting compositions, and sometimes combining elements from multiple references.
Rather than a step-by-step guide, I’m going to showcase some drawings that were all based on captive animals I’ve encountered in various places.
Each one was built from sketches and photos taken in zoos, sanctuaries, or rescue centers, but the final images go beyond what I saw on the day.
I’ll walk you through how I approached each piece, the decisions I made, and how I worked around the limitations.
‘Eye Contact’ Drawing a Jaguar from a Zoo Reference
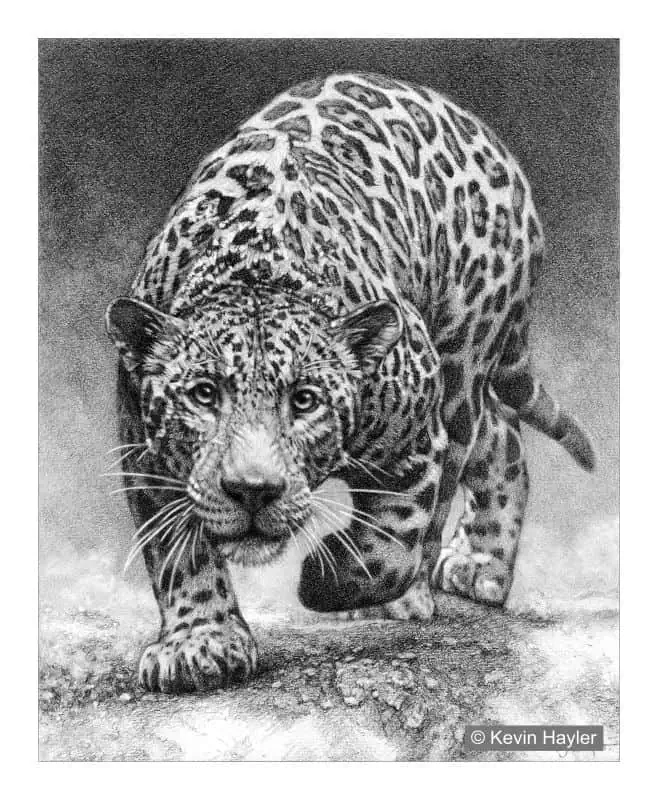
This drawing, ‘Eye Contact’, captures a jaguar in motion, it looks as if it’s emerging from the shadows with intense focus. I wanted to emphasize its stealth and power, drawing attention to the way it prowls forward.
The reference for this piece came from a split-second moment at Singapore Zoo. I was standing behind a group of noisy school kids during treat time, when the keepers threw titbits to keep the jaguars active.

The animal was just about to leap into the water, and I quickly took a series of shots, hoping to capture something. The photos were awful, blurred, cluttered, and full of distractions, but the pose in this shot was perfect. I knew I had something I could work with.
The challenge was translating a poor reference into a strong drawing.
I stripped away the background noise, deepened the shadows, and focused on the jaguar’s pose and patterns to bring out the drama. The contrived foreground adds a sense of movement without taking attention away from the subject.
It’s a great example of how a bad photograph can still inspire a compelling drawing. The key is to recognize potential, simplify what isn’t working, and make artistic choices that serve the final image.
This post will inspire you: 21 Realistic Big Cat Drawings
‘The High Life’ – Rebuilding Detail from a Bad Reference

Giraffes have wonderfully expressive faces, and this one, with its pursed lips and raised eyebrows, looked like it was sucking a lemon. It was a perfect subject for a portrait.
I took the reference photo at the Langatta Giraffe Centre in Nairobi, where visitors can get face-to-face with the giraffes from a raised platform. Instead of taking the usual head-on shot, I photographed this male from the bottom up to emphasize his height and attitude.
Typically, I had the wrong camera settings, and the entire image was overexposed, half of the detail was lost. I don’t make my life easy.

That left me with a challenge. I had a great pose but no texture to work from. The highlights were completely blown out, and the fur patterns were barely visible. I had to reconstruct the details from intuition, other reference images, and a lot of corrections.
This is a good example of how a strong pose matters more than a perfect photo.
In the end, the technical mistakes in my reference didn’t matter that much because, with care, I could rebuild the missing information.
This is how I drew this giraffe: How to Draw a Realistic Giraffe: Step by Step and Get Great Results
Tiger in the Grass – Constructing a Wild Setting

This drawing was one of my bestsellers for years, a reliable ‘bread and butter’ print that consistently connected with people who saw it in person. The intense gaze of the tiger, half-hidden in the grass, seemed to draw viewers in, creating a feeling of suspense.
The tiger itself was originally photographed at London Zoo, but the setting is entirely constructed. I wanted to place the tiger in a more natural, wild-looking environment, making it feel as though it was emerging from tall grasses.
There’s nothing in the original photo that suggests this scene, it was all created with a large dose of ‘artistic license’
To achieve the soft-focus effect in the foreground, I used a putty eraser to lift highlights and suggest movement, almost like a bokeh effect in photography.
This blurred foreground helps frame the tiger and gives the drawing more depth, creating a sense of authenticity despite being an artificial composition. An added bonus of blurring the grass was that it eliminated the need draw more authentic native grass.
This drawing is a good example of how a zoo reference can be transformed into something completely different. By carefully controlling focus and atmosphere, I was able to take a captive subject and present it as though it was in the wild.
Drawing Zoo Animals: Final Thoughts
Zoos, sanctuaries, and rescue centers offer a practical way to study animals up close, providing the opportunity to sketch, photograph, and gather references that would be difficult, if not impossible, to capture in the wild.
They allow you to focus on the subject while also giving you the freedom to modify settings and compositions to create more compelling artwork.
As a footnote, I haven’t raised the issue of zoo ethics here. That’s a personal decision for each artist to make. My focus has been purely on the practicality of using captive animals as subjects and how to translate those references into strong artwork.
If you found this useful, I encourage you to check out more of my related posts for tips on drawing animals, improving your techniques, and making your work more sellable.

If you enjoyed this post you will like these too:
- 12 Wildlife Art Bestsellers (Use These Subjects to Make Money)
- 25 Realistic Animal Drawings
- How to Start Drawing Wildlife and Become a Wildlife Artist
- 12 Best Monkey Art Pencil Drawings
- 7 Bird Art Bestsellers: Best Wall Art Selling Guide
- 9 Farm Animal Art Bestsellers: Home Decor That Sells!
- How to Draw Realistically: 11 Realistic Drawing Tips
- Drawing Realistic Animals From Photographs
If You Want My Lifestyle, This is How I did it
PIN THIS


Hi, I’m Kevin Hayler
I’ve been selling my wildlife art and traveling the world for over 20 years, and if that sounds too good to be true, I’ve done it all without social media, art school, or galleries!
I can show you how to do it. You’ll find a wealth of info on my site, about selling art, drawing tips, lifestyle, reviews, travel, my portfolio, and more. Enjoy