

You’ve probably tried copying photos or following free tutorials, only to feel frustrated when the drawing goes wrong. It happens because drawing isn’t just about copying, it’s about learning how to see.
Without a solid foundation your proportions go off, and your confidence takes a hit.
It’s a set of simple skills you can practice every day. Once you have them, everything else gets easier.
Here are the essentials you need to learn before chasing style or advanced projects.
We’ll start with how you hold the pencil because that affects every mark you make.
Disclaimer: When you buy something via my affiliate links I earn from qualifying purchases and sometimes earn a commission, at no extra cost to you. I am an Amazon Associate among others. I only recommend trusted sites.
Holding the Pencil Correctly
How you hold a pencil changes the way you draw. There isn’t one right way, it’s about using the right grip for the job. Artists switch positions depending on the effect they are trying to achieve.
Out of all the ways you could hold a pencil, these three matter.
The first is the writing grip. This is the grip most people already know.
The Writing Grip
This is the grip you already know from writing. It offers total control and precision, which makes it perfect for fine detail and finishing touches. When you need accuracy, this is the grip you use.

The problem is that beginners often rely on it too much. They press too hard in the early stages when they should be sketching lightly. Heavy lines are difficult to correct and leave grooves in the paper.
This grip forces you to draw from your wrist. It is tight and deliberate.
Another common mistake is resting the side of the hand on the sheet. This smudges the drawing and makes the paper dirty.
This post will help: How to Prevent Your Drawings From Smudging Everytime
Use this grip for the final stages of a drawing, not for mapping out the first shapes.
The Underhand Grip
The underhand grip is used when you hold the pencil further back, often towards the end. Instead of drawing from the wrist, you draw from the elbow and shoulder. This small change makes a big difference.

You can make longer, smoother lines without the stiffness that comes from short wrist movements. It also stops you pressing too hard, which keeps your sketches light and easy to adjust.
This grip is ideal for mapping out the first shapes and keeping your drawing loose at the start.
Once the structure is in place you can switch grips to refine the work.
The Overhand Grip
The overhand grip works in a similar way to the underhand grip, and you will often swap between the two. Some artists find it gives a little more control while still allowing the freedom of arm movement.

It is especially useful for drawing with the side of the pencil. This creates broad strokes that can bring out the tooth of the paper and build tone quickly. The grip also helps when shading large areas smoothly without the strain that comes from using the writing grip.
Use it to block in values, keep your marks loose, and vary your line weight with ease..
Practicing Line Quality
When you start a drawing you should sketch the shapes lightly, knowing they will be wrong and look rough. Many beginners expect their first marks to be perfect, and they imagine experienced artists get it right straight away. Nothing could be further from the truth.
Drawing is about searching for the right line. You sketch the same line several times until one of them hits the sweet spot. That is the line you follow, but you leave the rest in place.
Do not erase at the beginning. Those loose, messy lines give the drawing movement and life. They are part of the process and not mistakes.
Most experienced artists will change their grip and constantly turn the paper to find the easiest angle. It is far easier to draw a good line if the paper is working with you rather than against you
This is related: What’s the Best Angle For Drawing and Sketching?
Understanding Shapes and Proportions
Every drawing is built from simple shapes. Circles, squares, and triangles are the building blocks of everything you see. If you can break things down into these shapes, you can make sense of even the most complicated subjects.
Beginners often jump straight into details and lose the structure. The result is a drawing that looks off, even if the details are good. The trick is to block in the big shapes first, then compare their sizes and angles. Ask yourself: is this longer or shorter, wider or narrower, higher or lower?
You can use your pencil to measure lengths and angles. Hold it out at arm’s length, line it up with the subject, and compare one part of the drawing to another. This helps you judge proportions without guessing.

Do not worry about being exact. You are training yourself to judge relationships, not to copy perfectly. With practice your eye becomes sharper, and your proportions improve without you even noticing.
The important thing is to stay loose, adjust as you go, and avoid getting attached to your first marks. Most shapes will need correcting, and that is part of the process.
This is a free lesson by Brent Eviston. Check him out, he explains things so clearly
Shading and Tonal Values
Drawing is not only about outlines. What gives a drawing depth is tone, the range of light and dark. Learning how to shade is about training your eye to see those values and your hand to control the pencil.
Beginners often make the mistake of relying on outlines alone. Without tone, everything looks flat. Another mistake is smudging with a finger, which makes the paper dirty and the tones lifeless. Instead, learn to control pressure and build layers with the pencil.
A good exercise is to make a simple value scale from light to dark. Start with the faintest mark you can make and gradually build up to the darkest. Try hatching, cross-hatching, and layering strokes in different directions. Each method changes the texture and the effect.
Think in terms of masses of light and shade, not individual details. Once you can see the big areas of tone, you can model form and make your drawing look solid.
You can see how shading and tone gives the illusion of depth in this landscape, and that leads us nicely to perspective.

Perspective Basics
Perspective is what gives your drawing space and depth. Without it, objects float on the page and the drawing looks flat. Even a simple understanding of perspective will improve your work straight away.
The most useful to learn is one-point perspective.
In one-point, all lines recede to a single vanishing point on the horizon. In two-point, lines recede to two points. These systems explain how objects shrink as they move away from you.
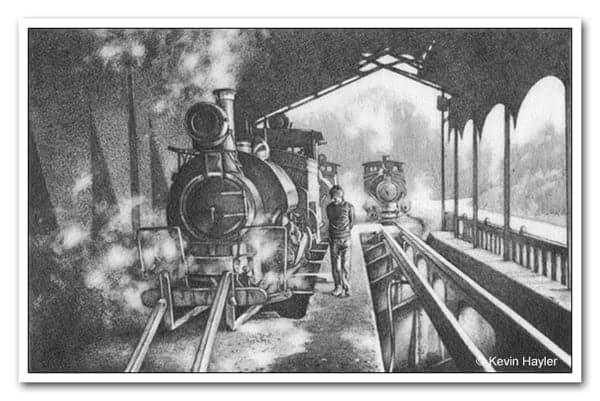
The drawing of the trains above shows this clearly. The roof, the platform, and the tracks all angle towards the same point in the distance. That simple structure creates the sense of space and leads your eye through the picture.
I’m well aware that most drawings are far more complex, with many vanishing points in one drawing, but the principle is easier to grasp when looking at one-point perspective.
Beginners get lost trying to establish lines of sight and vanishing points that end far off the drawing paper itself. I’m not suggesting it’s easy. It’s difficult, especially drawing curves and organic shapes. Buildings are straight forward by comparison.
Just remember these two tips.
Establish the horizon line if you can. That is a known horizontal and it helps you to see where your vanishing points will end.
Then be sure to note your verticals. If you are sitting in front of a building, to use the obvious example, all the corners of the buidings will, almost always, appear to be vertical and parallel to each other.
These are guides, not rules.
Learn to See Negative Space
Most beginners only look at the object they want to draw. They focus on outlines and ignore everything else. The problem is that your brain fills in gaps with what it thinks is there, not what you actually see.
Negative space forces you to see differently. Instead of drawing the object, you draw the empty spaces around it.
The gaps between limbs and body, the shape of sky between branches, or the angles inside a chair frame. These spaces are often easier to judge than the object itself.
You can see this clearly in this drawing.

If you like the way I draw and want to try things for yourself, this is my basic kit
You can clearly recognise the gaps between the trees. That is negative space. It gets more complicated within the drawing itself but look at the gap between the front two legs.
Its just as important to draw the triangular shape accurately as it is the legs themselves.
When you shift your attention to negative space, mistakes in proportion jump out straight away. The drawing becomes more accurate.
A good exercise is to block in the shapes between objects and compare them with what you see. If the negative shapes are right, the subject will fall into place.
Observation and Daily Practice
The most important skill in drawing is learning to observe. You have to train your eye to look closely and see what is really there. Most people draw what they think something looks like instead of what they actually see. That is why practice matters so much.
You don’t need hours every day. A few minutes of focused sketching is enough to keep improving. Draw objects around you and work from life whenever you can. The point is to make drawing a regular habit.
Do not expect every drawing to turn out well. Most will not. The progress comes from repetition, not from producing perfect results. Over time your eye sharpens, your hand steadies, and your confidence grows. Daily practice builds skill faster than any tip or trick.
7 Drawing Basics: Final Thoughts
Do you remember school art classes and how dull they often felt? You were told to draw still life setups with bottles, shoes, or random objects that no one really cared about.
It’s no surprise people gave up in boredom. If the subject doesn’t interest you, drawing quickly becomes a chore.
The trick to learning is to pick subjects you actually enjoy. If you love wildlife, like i do, draw birds and animals. If you like like landscapes, sketch trees. The basics are the same no matter what you choose.
By working on something you care about, you will stay motivated long enough to see progress.
Exercises have their place, but they are not enough on their own. Skill develops slowly and in small steps. You only get there if you keep coming back, and you will only do that if you like what you are drawing.
Success comes with time, persistence, and subjects that keep you interested.
If you are really keen you are better off taking structured lessons than developing ameteur bad habits that are hard to correct later on.
Check out the paid drawing courses by Brent Eviston below. They are perfect for Beginners.

Don’t leave yet, keep scrolling to the end in case you miss something.
These posts will help you with your drawing:
- How to Find Your Drawing Style: In 8 Practical Ways
- How to Get Better at Drawing: 16 Tips to Improve FAST
- How to Know When Your Drawing is Finished: Don’t Ruin it!
- How to Make Your Drawings Interesting: 14 Ways to Improve
- How to Plan and Compose Your Art: A Beginners Guide
- Is Drawing a Grid Cheating? – Do Real Artists Use Grids?
- Tracing Art – Is It Good or Bad? When Is Tracing Cheating?
PIN THIS


Hi, I’m Kevin Hayler
I’ve been selling my wildlife art and traveling the world for over 20 years, and if that sounds too good to be true, I’ve done it all without social media, art school, or galleries!
I can show you how to do it. You’ll find a wealth of info on my site, about selling art, drawing tips, lifestyle, reviews, travel, my portfolio, and more. Enjoy