
You’ve got a stunning black and white print or drawing, but now comes the tricky part, framing it. Do you go with a black or white frame? Mat or no mat? Glass or acrylic?
It’s easy to get overwhelmed, and the wrong choice can make your art look dull, out of place, or let’s be honest, cheap and tacky.
Framing black and white art isn’t just about protecting it, it’s about achieving the best aesthetic. I’ve got you covered. I’ll walk you through everything you need to know.
By the end, you’ll have the confidence to frame your artwork beautifully and make your beautiful new picture the focal point of your room.
Let’s get started!
Choosing the Right Artwork to Frame
Not all black and white art is the same, and the way you frame it depends on the type of piece you have. Some artwork needs extra protection, while others can get away with a simple pre-made frame.
Before you start shopping for frames, consider what you’re working with:
Fine Art Prints – High-quality giclée prints deserve high-quality materials. These prints are made with archival inks on acid-free paper, which means they can last for decades if framed correctly. Always use an acid-free mat and UV-protected glass to prevent fading over time.
Budget Prints (POD & Digital Downloads) – Prints from print-on-demand services or digital downloads are typically printed on standard paper. They may not need the same level of protection as fine art prints, but they still look best with a mat and frame that complements the artwork. A pre-made frame with a mat can be a cost-effective and stylish solution.
Photographs – Whether it’s a black and white portrait or a landscape, the finish of the photo matters. Glossy prints reflect a lot of light, so non-reflective glass can help reduce glare. Matte photos have a softer look and work well with both modern and classic frame styles.
Original Drawings – Graphite, charcoal, and ink drawings are delicate and can smudge if not framed properly. Always use a mat to keep the drawing from touching the glass. If you’re framing a charcoal or pastel drawing, consider a floating mount to capture any loose dust, give the piece more depth.
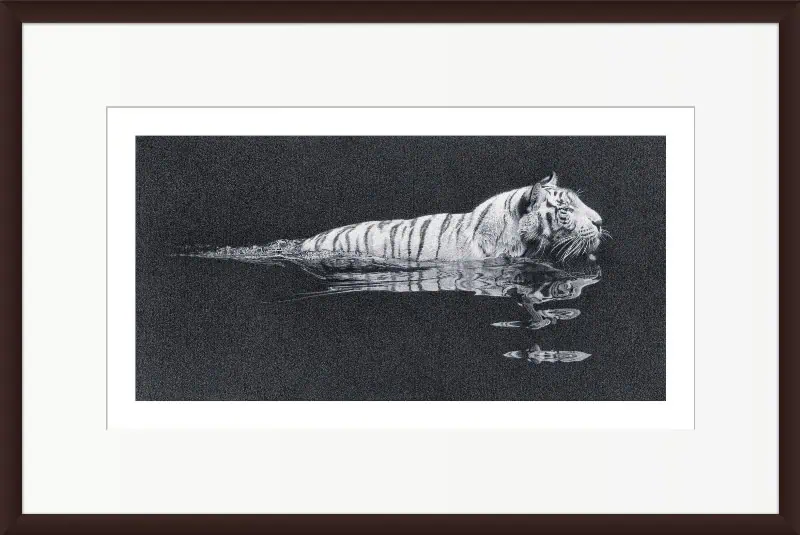
Some black and white art looks best with a borderless frame, while others benefit from a mat to create separation from the frame. Deciding how to present your piece is the first step in framing it like a pro.

A simple and effective framing example. Note the generous white border around the outline. This is a subtle but key reason why this frame looks so stylish.
Choosing the Perfect Frame
The right frame can make or break the look of black and white art. It should enhance the artwork without overpowering it. The key is to find a balance between style, contrast, and how it fits into your space.
Frame Colors
- Black – Bold and modern, creates strong contrast
- White – Clean and minimalist, great for a gallery-style look
- Charcoal Gray – A softer alternative to black, adds subtle depth
- Natural Wood – Warm and organic, works well in neutral or rustic spaces
- Metallics (Silver, Pewter, Gold) – Can complement photography but should be subtle
Frame Widths
- Thin Frames – Sleek and modern, keeps the focus on the artwork
- Medium Frames – Versatile and balanced, suits most black and white pieces
- Thick Frames – Bold and eye-catching, ideal for larger or statement pieces
Frame Materials
- Wood – Classic and timeless, available in a range of finishes
- Metal – Contemporary and minimal, pairs well with photography
- Acrylic/Composite – Lightweight and budget-friendly, but can look less premium
A good frame should complement the art without competing for attention. Whether you go for a minimalist black frame, a natural wood tone, or something bold, the right choice will make your black and white artwork shine.


Sometimes it’s more stylish to add a silver picture frame when your artwork is to be hung on a dark wall. This is a good example.
Choosing the Right Mat for Black and White Art
A mat isn’t just decorative, it helps create space between the artwork and the frame, adding depth and a polished look.
Do You Need a Mat?
If your artwork has a built-in border or you want a sleek, modern feel, you might choose to skip the mat. But for most black and white pieces, a mat adds breathing room and makes the composition feel balanced and more sophisticated.
It also prevents the artwork from touching the glass, which is especially important for delicate mediums like charcoal and graphite.
Mat Colors
- White or Off-White – Clean, classic, and works with almost any black and white artwork. One word of caution, brilliant white can mute a monochrome image.
- Black – Bold and dramatic but can darken the overall look. It can look striking with a silver frame and a black-core board.
- Charcoal Gray – A subtle, softer contrast for a more understated effect
- Natural Tones (Ivory, Warm Gray, Soft Beige) – Adds warmth without overpowering the artwork
- Black-Core Mats – White, black or tinted on the surface but with a deep black inner edge for a professional finish.

You can see in this example, how the image is double-framed when mounted with black-core matboard. A dramatic difference for very little extra money.
Single vs. Double Mats
A single mat keeps the framing clean and simple. A double mat adds an extra layer of depth by revealing a thin outline of a second color beneath the main mat. This works well if you want a slight contrast without overwhelming the art.
Floating Mount Option
For original drawings or textured prints, a floating mount can be a great alternative to a traditional mat. Instead of covering the edges with a mat, the artwork is mounted on top of the backing board and “floats” within the frame.
This technique is sometimes used to highlight the raw edges of the paper, or give it a more contemporary, gallery-style look.
Mat Board Quality
- Acid-Free Mats – Essential for fine art prints and original drawings to prevent yellowing over time and contaminating the print/paper beneath
- Standard Mats – More affordable but can degrade and damage artwork over time
- Black-Core Mats – Adds a refined, professional touch with a deep black inner edge
Mat Border Width
Choosing the right mat width helps balance the composition. Use these border-widths as a guide only, they are not set in stone:
- 1.5 – 2 inches – Ideal for small artworks, keeps the focus on the piece
- 2 – 3 inches – A balanced, standard choice for most medium-sized artwork
- 3 – 5 inches – Creates a more dramatic effect, best for larger pieces or minimalist framing
A well-chosen mat enhances black and white art by creating contrast and giving the piece room to breathe. Whether you go for a single, double, or floating mount, the right mat will make all the difference in your final presentation.

The example on the left is very simple and basic. The mount is cut to the edge of the image and the off-white matboard has narrow margins. This is a standard white-core mountboard. I see people frame art this way all the time.
Contrast that with the same image on the right. The mount is warmer with wider borders, and there is a generous white margin around the image. The black beveled edge around the aperture makes all the difference.
What would you rather have on your wall? I’d go with the example on the right.
Choosing the Right Glass: Clarity vs. Protection
Glass does more than protect your black and white art, it affects how it looks on display. The wrong choice can create glare, mute contrast, or even cause fading over time. The key is to balance protection and visibility based on where you plan to hang your artwork.
Standard Glass
This is the most affordable option, offering basic protection but high reflectivity. If your artwork is in a well-lit space, glare can be an issue. Standard glass works best for rooms with controlled lighting.
UV-Protected Glass
This glass blocks harmful UV rays that can cause fading over time. It’s a must for fine art prints and original drawings, especially if they’ll be exposed to natural light. While it’s more expensive than standard glass, it helps preserve artwork for decades.
Non-Reflective Glass
Designed to reduce glare, this glass has a slight texture that diffuses light. While it helps with visibility, it can also soften fine details in high-contrast artwork. It works best for large pieces displayed in bright rooms.
Acrylic (Plexiglass)
This lightweight alternative to glass is shatterproof and safer for larger frames. However, standard plexiglass scratches easily and can attract dust due to static. It’s best suited for high-traffic areas or kids’ rooms where safety is a priority.
Anti-Glare Acrylic
A better version of standard plexiglass, this acrylic has a special coating to reduce reflections. It keeps the clarity of the artwork while eliminating harsh glare. It’s a great option for rooms with lots of natural light.
Museum-Grade Glass & Acrylic
High-end framing materials like museum glass and archival acrylic offer the best clarity, UV protection, and anti-glare properties. These are used in galleries and conservation framing, but for most people, they’re not necessary.
If you’re framing a valuable or sentimental piece, they’re worth considering, but for everyday art, UV glass or anti-glare acrylic is usually enough.
The best choice depends on your budget, lighting conditions, and the value of your artwork. If glare is a problem, go for non-reflective or anti-glare acrylic. If longevity is the priority, UV protection is key.
Picking the right glass ensures your black and white art stays crisp and well-protected for years to come.
Custom Framing vs. Pre-Made Frames vs. DIY
When it comes to framing black and white art, you have three main options, custom framing, pre-made frames, or a DIY approach. Each has its pros and cons, depending on your budget, time, and how much control you want over the final look.
Custom Framing
If you want a professional finish, custom framing is the best option. Everything is tailored to your artwork, from the frame size and style to the mat and glass choices.
Pros:
- Perfect fit for any artwork size
- Wide selection of high-quality materials
- Professional assembly and finishing
- Best for valuable or sentimental pieces
Cons:
- Expensive, especially for large artwork
- Can take weeks to complete
- Requires working with a framing shop
Pre-Made Frames
A great option for budget-conscious framing, pre-made frames come in standard sizes and are widely available. Many include mats, making them a quick and easy choice for prints and photographs.
Pros:
- Affordable and easy to find
- Quick and convenient, no wait time
- Decent selection of styles and finishes
Cons:
- Limited size and material choices
- Mats may not be archival or the right proportion for your artwork
- Less control over final presentation

If you look closely at the two jaguar prints above, you’ll notice that they’re positioned slightly differently.
The left-hand example is centered perfectly in the frame. You can see the side borders are narrower than the top and bottom borders.
Another option, on the right, is to have a wider border at the bottom, with the top border and the sides being the same width.
Sometimes it works well, other times it’s less successful. It depends on the dimensions of the image.
Take note that I left a white margin around the outer borderline.
DIY Framing
If you like hands-on projects, DIY framing lets you customize the look while keeping costs low. You can buy a pre-made frame and swap out the mat and glass, or build a frame from scratch if you have the tools and skills.
Pros:
- Cost-effective, especially for multiple pieces
- Full creative control over materials and design
- Can be a rewarding project for artists and collectors
Cons:
- Requires time and effort
- Can be tricky to assemble if you’re new to framing
- Mistakes can end up costing more than a pre-made frame
Custom framing is ideal for one-of-a-kind artwork or high-value pieces, while pre-made frames work well for standard prints and budget-friendly decor. If you enjoy DIY projects, framing your own black and white art can be a fun and personal way to showcase it.
Hanging and Displaying Black and White Art
Framing is only half the battle, how you hang and display your black and white art makes all the difference. Placement, spacing, and lighting all contribute to how your artwork is perceived in a space.
Ideal Height
Hang your artwork so the center of the piece is at eye level, which is typically 57–60 inches from the floor. If you’re hanging a collection, align the center of the grouping rather than the tops or bottoms of the frames.
Spacing for Gallery Walls
If you’re creating a gallery wall, keep the spacing between frames consistent at 2–3 inches. This creates a clean, cohesive look. Larger pieces can handle more space between them, while smaller prints should be closer together to feel connected.
Wall Colors
Black and white art is neutral, making it one of the most versatile decor choices. It complements any color scheme, from minimalist white walls to deep, moody tones.
- Dark Frames on Light Walls – A black or charcoal frame creates strong contrast and makes the artwork stand out. This is ideal for crisp, modern spaces.
- Light Frames on Dark Walls – A white, light gray, or natural wood frame softens the contrast against deep-colored walls. This works well in dramatic, cozy interiors.
- Matching Tones for a Seamless Look – A gray frame on a gray wall or a black frame on a dark charcoal wall creates a subtle, sophisticated effect.
Regardless of the wall color, black and white art brings balance and contrast, making it an effortless addition to any room.

Lighting Considerations
Soft, indirect lighting works best for black and white artwork. Avoid placing frames in direct sunlight, as prolonged exposure can cause fading, even with UV-protected glass. If you want to highlight a piece, consider using picture lights or wall sconces for a subtle, gallery-like effect.
A well-framed and thoughtfully placed black and white piece can transform a space. Whether it’s a single statement piece or part of a larger collection, the right placement ensures your art always looks its best.
Common Framing Mistakes & How to Avoid Them
Framing black and white art seems simple, but a few common mistakes can make even the best artwork look cheap or unbalanced. Avoid these pitfalls to get a professional, polished finish.
Skipping the Mat to Save Money
A mat does more than separate the artwork from the frame, it adds breathing room and elevates the presentation. Choosing to frame black and white art without a mat just to save money can make a great picture look unfinished or low quality.
A well-chosen mat enhances contrast, draws attention to the artwork, and prevents it from looking squeezed into the frame.
Choosing the Wrong Picture Frame
The frame should complement the artwork, not compete with it. A frame that is too bold in color or style can dominate the eye and take attention away from the art itself. On the other hand, a frame that blends too closely with the mat can create a flat, lifeless look.
A good frame should contrast slightly with the mat, helping define the space between the artwork and the outer edge. If you’re using a white mat, a black, charcoal, or natural wood frame works well. If the mat is dark, a lighter or metallic frame can provide the right balance.
Buying a Frame to Fit the Picture
It’s tempting to grab a standard-sized frame and force your artwork to fit, but this rarely works unless the print is made specifically for a commercial frame.
When the frame and image are different ratios, the picture looks unblanced within the frame.
Instead, choose a frame that suits the artwork, not the other way around. If you’re using a pre-made frame, buy one far bigger than required and the uneven margins will not have a noticable negative effect.
Mounting the Mat Directly to the Edge of the Image
A common mistake is placing the mat right up to the edge of the image without leaving a white margin. This can make the composition feel pinched. Leaving a thin white border between the artwork and the mat creates visual space and a natural transition to the frame. Much more pleaing to the eye.
If your print, photo, or original arwork, doesn’t have a built-in white margin, double mounting is the easy solution. Use an inner mat slightly larger than the artwork, then place a second mat on top with a wider border. This creates a crisp, layered look that gives the artwork room to breathe.
Bad DIY Framing
DIY framing can be a great way to save money, but poor craftsmanship can ruin the look of your artwork. Common mistakes include:
- Uneven bevel cuts on the mat – A clean, precise bevel is essential for a professional look. A rough, jagged, or crooked edge immediately cheapens the framing.
- Poor frame joints – If the frame corners aren’t tightly joined, gaps will be visible, making the piece look poorly assembled. Proper alignment and a secure bond are key to a polished result.
If you’re new to DIY framing, consider practicing on a less valuable piece before framing an important artwork. Investing in quality tools, like a proper mat cutter and miter saw for clean frame edges, can make a huge difference in the final presentation.
How to Frame Black and White Art: Final Thoughts
Framing black and white art comes down to choosing the right frame, mat, and glass to suit the artwork and the space it’s in. A good frame should support the art without overpowering it, and a properly sized mat creates balance while keeping the artwork from touching the glass.
You’ve learned how different types of black and white art, fine art prints, photographs, and original drawings, require different framing approaches.
You now know how to pick a frame color and material that works, why mat size and spacing matter, and what type of glass to use for the best protection and clarity. You’ve also seen the most common framing mistakes and how to avoid them.
Taking the time to get these details right makes all the difference in how the final piece looks on the wall.
If you got this far you’ll be interested in these posts:
- 10 Black and White Wall Art Ideas For Your Kitchen
- 10 Staircase Decor Wall Art Ideas With Framed Drawings
- Black & White Animal Art for Minimalist Bedrooms
- 10 Cozy Small Bedroom Ideas With Black and White Wall Art
- Does Art Fade? Does Pencil Fade? Do Paintings Fade?
- How to Store Drawings Safely: The Ultimate Guide
- How to Protect and Preserve Your Pencil Drawings Properly
- Where and How to Print Art Prints From Etsy (Downloads / Printables)
- What Are Limited Edition Prints? 12 Things You’ve Got to Know
PIN THIS


Hi, I’m Kevin Hayler
I’ve been selling my wildlife art and traveling the world for over 20 years, and if that sounds too good to be true, I’ve done it all without social media, art school, or galleries!
I can show you how to do it. You’ll find a wealth of info on my site, about selling art, drawing tips, lifestyle, reviews, travel, my portfolio, and more. Enjoy