
Kevin Hayler: Professional Wildlife artist, author, and traveler.
We’ve probably all been there, you buy a beautiful print only to end up paying through the nose to frame it. OUCH! Leaves a bad taste doesn’t it? But it doesn’t have to be that way.
Here are 9 ways of framing on a budget to SAVE YOU MONEY!
It’s perfectly possible to frame your picture stylishly, and without taking out a mortgage to pay for it. I’ve been doing it for years.
I’ll show you how – PLUS I’ve compiled some insanely useful framing charts as a bonus. These are gold.
Disclaimer: When you buy something via my affiliate links I earn from qualifying purchases and sometimes earn a commission, at no extra cost to you. I am an Amazon Associate among others. I only recommend trusted sites.
1. Use Ready-Made Standard Frames to Save Money
Yeah, I can hear you, your picture isn’t a standard size, but it’s not the problem you think it is.
Most images almost fit, it’s a near miss but that’s OK, a slight tweak will usually work.
The trick is to buy a frame bigger than you think you need.
Pictures tend to look classier with bigger borders, so center your print and allow for wide margins.
The frame on the left below is a typical example, the side borders are narrower and the top and bottom are slightly wider.

The one on the left looks pretty good. It’s in a ready-made 16″ x 20″ frame with a mount cut to fit. On the right, the top margin is the same width as the sides, meaning the bottom margin is wider. Far from looking odd this often looks better than a perfect fit.
Years ago a picture was always presented with a wider border at the bottom. Why?
Because a picture frame is usually hung high up on the wall, and viewed from below, there’s a foreshortening effect on the eye.
It’s an optical illusion. The bottom margin appears too narrow, therefore, a wider border corrects this distortion. Modern framers rarely do this.
That still leaves the problem of deciding which size frame to buy for your print.
I can help.
At the end of this guide,, I’ve compiled a list of commonly available standard frame sizes WITH the most common ready-made mounts.
If you’re lucky you’ll get a perfect fit, if not you can easily determine the nearest suitable size.
Keep scrolling. All the common frame sizes are listed at the end.
This is related: Art Display Panels: Make Your Own For Art Shows – It’s So Easy!
2. Use Clip Frames to Frame on a Budget
Before you groan, listen up it works. One of my customers told me about this.
First, buy some acid-free artist tape from an art supply store or online.
Then buy a clip-frame twice as large as the print.
- Back it with black paper.
- Center the print.
- Adjust it vertically until you are happy.
- Hinge the top corners with vertical strips of acid-free tape
Flip your print and do the same on the underside. You now have two sets of hinging tape on the top edge, two strips on the front of your picture, and two on the back.
- Flip your picture back into place,
- Peel off the top front hinges and clip on the glass.
- You now have a stylish contemporary look on the cheap

3. Make Your Own DIY Picture Frames
This will suit some, but not all. I know from personal experience that cutting frame moldings is tricky without the right tools.
The cost savings are high when you get it right, the hassle is also high and wouldn’t you rather be painting?
I used to save a considerable amount of money buying my supplies from a wholesaler. If you are a registered business, this is the way to go. You’ll be surprised how cheap framing supplies are. No wonder there are so many picture framers out there.
This method is viable when you need a bespoke frame for a large one-off work of art.
You can always try your hand at making frames yourself.
4. Use Second-Hand Picture Frames
With a little patience and a keen eye, you will find a never-ending source of good frames in Thrift stores, flea markets, and charity shops.
If you are very lucky you might come across just the right frame but the chances are you will have to apply some TLC to make things right.
It’s nothing a light sanding and a can of spray paint can’t fix and natural woods can be stained or varnished.
You may well have to replace the old hangers like D-rings, tacks, and wire. They can be bought online, from art suppliers or hardware shops.
Having renovated your frame and mounted your print your next step is to thoroughly clean the glass. Pay attention to the inside pane of course.
Any sticky label gum can be removed with WD40 or meths
Reassemble the frame, glass, mount, and backing board. Check the front for stray specks, dust, and hairs, and then replace it face down.
Secure the backing board using brass tacks tapped along each side to pin it in place. If you have a framers staple gun all the better.

Now using brown gummed tape seal the gap between the frame and backing.
Lastly, attach the D-rings using the previous marks as a guide. If you’re unsure then place the rings 1/3rd down, not halfway.
Attach the wire using a secure knot and you’re all done.
5. Cut Your Own Mat Board (Mounts) to Save Money
Cutting a beveled edge is quite a tricky job. You need the right tools to do it properly. Something like the Logan mat cutter or Maped mount cutter (UK). There are various models for different needs and budgets.

My advice is to hunt around for a good quote and get a framing service to cut a mat board (mount) to your requirements.
There is not much point in buying the right cutter for the job if you’re not going to use it regularly. And besides, you’ll still need to buy and store sheets of mat/mount board.
Get to Grips with your Art business with Katy on Domestika

6. Use a Black-Core Mat Board or Watercolor Paper to Mount Your Art
One way of making an extra impact without paying much more money is to use a black-core mat board (UK)
It’s great for black-and-white images so I often use it. There’s a black beveled edge instead of a white one which adds an extra borderline for no extra effort.
It looks expensive and POSH.
Alternatively, you could buy a sheet of watercolor paper or a regular tinted card. If your art or art print is precious always use acid-free paper.
Measure up accurately and cut the aperture larger than the image itself. I typically leave a 5-10mm border. Again an extra borderline will add some style and there are two ways you could do it.
Firstly you can use a double mount, with a black card or paper beneath and a tinted paper on top. Make the top card aperture 2mm bigger all-round. For this to look good, you have to be super accurate.
For the second method, use one sheet of paper but draw a black line around and parallel to the aperture edge.
Pencil the line very lightly and then use a fine-liner pen. Test the pen first on a piece of scrap in case it bleeds.
A pigment ink 0.5mm pen will work.
If you mess up, oh well who cares? it’s as cheap as chips. Do it again.
7. Buy Picture Frames and Mats in Bulk
I know to guys who do this, and I’ve contracted in bulk frame makers in the past.
It makes sense commercially, to produce your art to easily available standard frame sizes. If you can’t do this, for whatever reason, you can find a contractor to supply frames and mats to your specifications.
If you have a series of prints made to hang in sets it makes sense to present them as a collection. The public prefers to hang pictures in coordinated balanced displays. They like the frames to match, both in color and in size.
Ring around for quotes because framing at scale to a set pattern will save you a considerable amount of money. Matboards can be delivered in bulk in the same way.

By Kevin Hayler
8. Choose Plexiglass Acrylic Glazing For Framing
It’s usually cheaper to use plexiglass (clear acrylic) instead of glass.
If you are framing yourself Plexiglass has advantages:
- You can cut acrylic glazing at home
- It is lightweight and shatterproof
- You can pick it up in a DIY store
- It’s good value for money
There are some disadvantages:
- It scratches easily
- Interior grades might go yellow over time
- A light frame psychologically feels cheap to the customer
It is however a viable option, especially if you need to transport or post a glazed frame. There is no other practical choice. You will never package glass well enough to survive rough handling.
Choose an exterior grade if you want to protect your art with more certainty. It will last longer and block more UV.
9. Go Minimalist With Your Framing Designs
When in doubt, leave it out. To use the old cliche, ‘Less is More’
If budgets are tight, go for the simplest solutions. A thin black frame will work for most art. Failing that, a plain natural wood.
There is a caveat. Very cheap wood can devalue your art. Consider painting a cheap molding
Minimalist frames can fit into almost any decor style, traditional or contemporary. Simple no no-fuss framing allows the image to stand out and is unlikely to fall out of fashion.
BONUS CONTENT
Standard Frame and Mount/Mat Board Sizes
Buying a ready-made frame can save you a ton of cash and if you are an artist it’s the perfect way to make a bigger profit.
This information is very hard to find on the web.

Use the examples below to check these commercial sizes and match the apertures to your print dimensions.
Frames with Aperture sizes
| Frame Sizes | Mat Aperture |
| 12″ x 16″ | 8″ x 12″ |
| 12″ x 16″ | 8.5″ x 11″ |
| 12″ x 16″ | 9″ x 12″ |
| 16″ x 20″ | 8″ x 12″ |
| 16″ x 20″ | 10″ x 12″ |
| 16″ x 20″ | 11″ x 14″ |
| 16″ x 20″ | 12″ x 16″ |
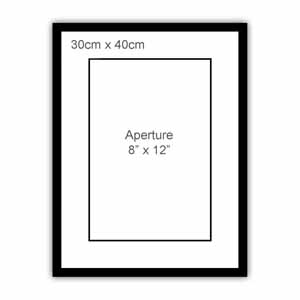
| 30cm x 40cm | 8″ x 12″ |
| 30cm x 40cm | (A4) 297mm x 210mm |
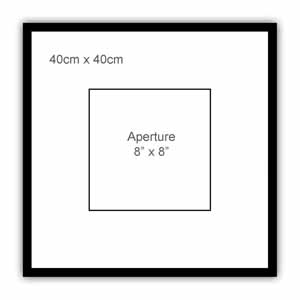
| 40cm x 40cm | 8″ x 8″ |
| 40cm x 40cm | 10″ x 10″ |
| 40cm x 40cm | 30cm x 30cm |
| 40cm x 50cm | 11″ x 14″ |
| 40cm x 50cm | 30cm x 40cm |
| 20″ x 24“ | 16″ x 20″ |
| 24″ x 34″ | 20″ x 30″ |
Standard larger frame sizes with matboard apertures (windows) that fit
| Frame Sizes | Mat Aperture |
| 6″ x 8″ | 6″ x 4″ |
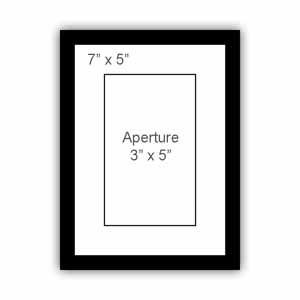
| 7″ x 5″ | 3″ x 5″ |
| 7″ x 5″ | 6″ x 4″ |
| 10″ x 8″ | 3″ x 5″ |
| 10″ x 8″ | 6″ x 4″ |
| 10″ x 8″ | 7″ x 5″ |
| 10″ x 10″ | 8″ x 8″ |
| 10″ x 12″ | 6″ x 4″ |
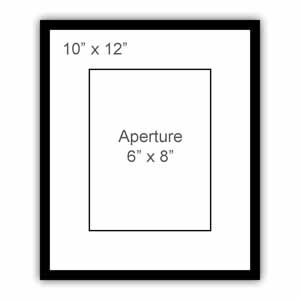
| 10″ x 12″ | 6″ x 8″ |
| 10″ x 12″ | 7″ x 5″ |
| 10″ x 12″ | 10″ x 8″ |
| 11″ x 14″ | 10″ x 8″ |
| 12″ x 16″ | 8″ x 12″ |
| 24cm x 30cm | 6″ x 8″ |
| 30cm x 30cm | 8″ x 8″ |
Standard smaller frame sizes with matboard apertures (windows0 that fit
These images will help you to visualize the frames.


This guide will help you save both time and cash. Win-win.

If you like the way I draw and want to know what I use, This is my basic kit

If you want to sell your art why not copy what I do? I’ve been selling this way for over 20 years! This stuff works

If You Want to Sell Your Art
Check this out!
Psst…it’s only $12.99!
If you found this article useful you may like these too:
- Repair Damaged Drawing Paper – 8 Ways to Rescue Your Artwork
- How to Make Prints of Your Art – Printing Art Explained in Detail
- What Kind of Art Sells Best? All The Secrets Revealed
- Can You Draw on Canvas? Your Questions Answered
- What’s the Right Paper for Pencil Drawing? (How to Choose Wisely)
- What Size Art Sells Best? Frames and Apertures – FREE Chart
- Pricing Art For Beginners: Originals, Art Prints, and Formulas
- Are Online Drawing Courses Worth it? I chose 5 of The Best For You!
Pin For Later


Hi, I’m Kevin Hayler
I’ve been selling my wildlife art and traveling the world for over 20 years, and if that sounds too good to be true, I’ve done it all without social media, art school, or galleries!
I can show you how to do it. You’ll find a wealth of info on my site, about selling art, drawing tips, lifestyle, reviews, travel, my portfolio, and more. Enjoy