Kevin Hayler: Professional Wildlife artist, author, and traveler.
In this guide, I will show you how to add a grid in Procreate, and how to customize it to your needs. It’s a simple process.
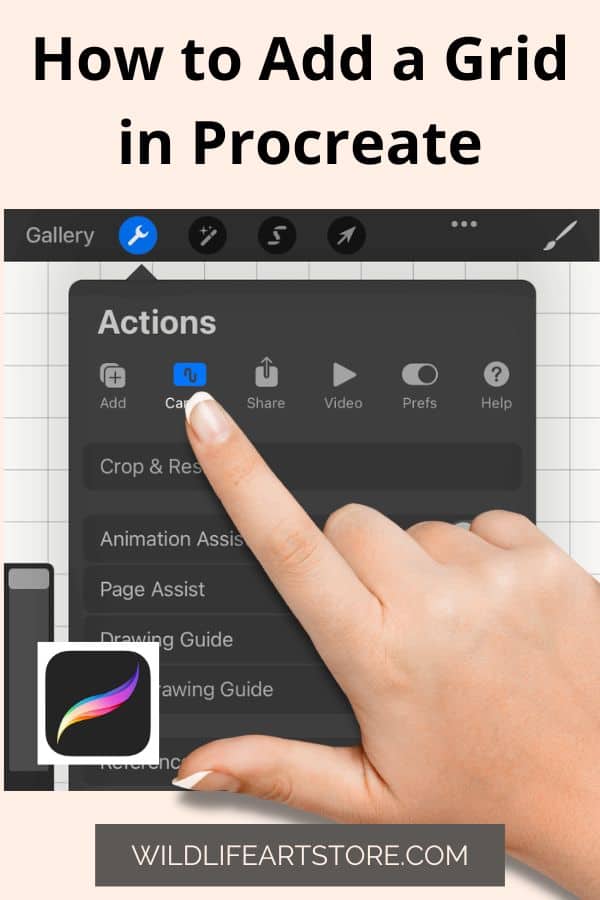
Open your gallery, click on an image, or open a new canvas by tapping the plus sign, on the top right. Click the wrench icon, on the top left. Select “Canvas” and toggle “Drawing Guide”. A grid will overlay your canvas. Click “Edit Drawing Guide” to adjust.
Ok, that’s the basics. Let’s go through the process properly, step-by-step.
Disclaimer: When you buy something via my affiliate links I earn from qualifying purchases and sometimes earn a commission, at no extra cost to you. I am an Amazon Associate among others. I only recommend trusted sites.
How Does the Grid Feature Work in the Procreate App?
The grid feature acts like a temporary non-destructive layer that overlays of your all your working layers. It is not a permanent addition and can be added or deleted at will. It acts as a disposable drawing guide.
It remains active and conforms to your settings until you change or remove the grid. This rule applies to artwork saved in your gallery. When you reopen a canvas the grid is set up exactly how you left it.
There are 4 drawing guide options in the settings:
- 2D Grid: The standard default setting. A square grid overlay.
- Isometric: A triangular grid overlay and useful or simple perspectives
- Perspective: Radial lines originating from a chosen vanishing point with a horizon line
- Symmetry: Automatically create a mirror image in 4 settings – Vertical, Horizontal, Quadrant, and Radial.
Options 1 and 2 are grids in the accepted meaning, and numbers 3 and 4 are guidelines that have a grid-like element.
All the YouTube videos are pretty basic. I found the volume was low on this one. You might have to turn on the subtitles.
How to Create a Customizable Grid in Procreate
You can add a grid to an existing canvas at any time, or you can start from scratch with a blank page.
This is how to start from a blank canvas in Procreate:
- Open the app and open the Gallery page
- Choose an existing canvas or create a new one by tapping the plus sign (+) at the top right of your screen.
- Choose your preset canvas size or tap the black folder icon with a white plus sign to customize your dimensions.
- Give the canvas a new title and enter your dimensions in the width and height bars below. This can be Millimeters, centimeters, inches, or pixels.
- Remember to set the DPI to 300 if you intend to print the work.
- When you are done tap the “Create” button. Top right. Your canvas will appear in the editing interface.
This is how to add a standard grid in Procreate:
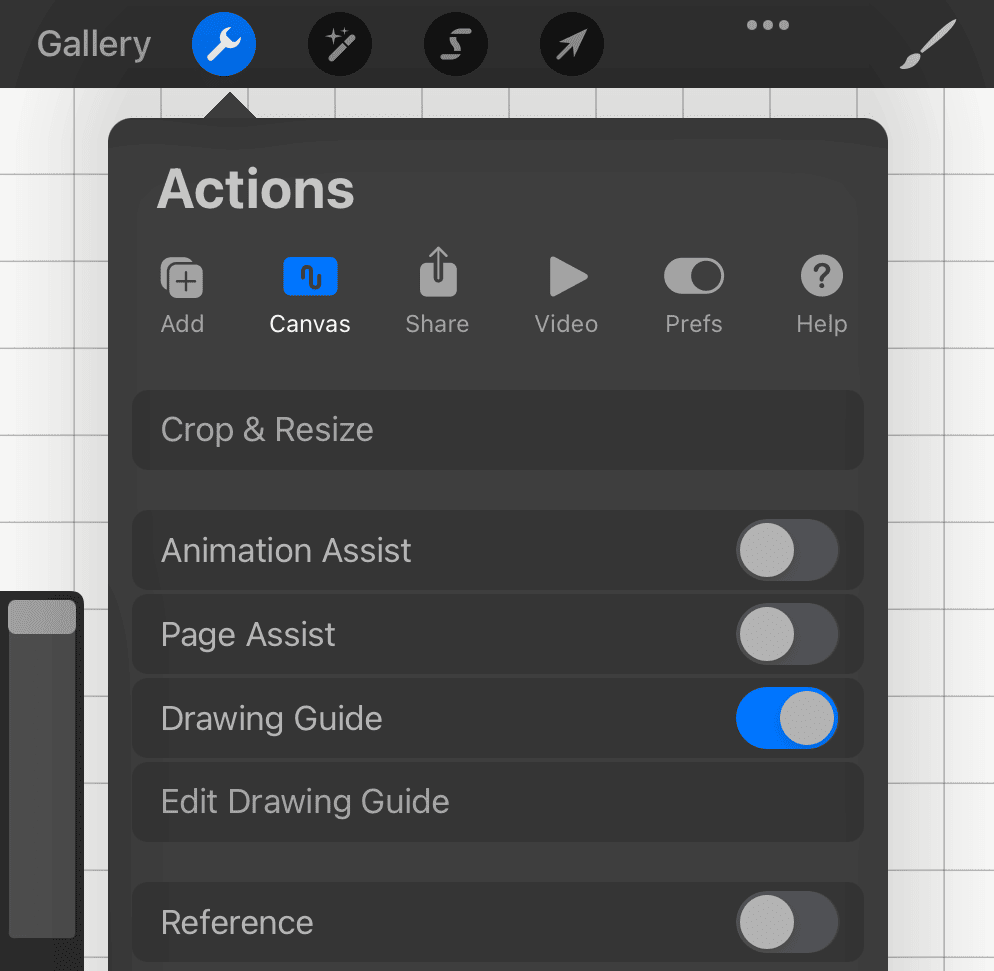
- To add a grid, tap the wrench icon at the top left next to the “Gallery” link. This will open the Actions tab.
- You’ll see a row of 6 icons, Tap the 2nd one along called “Canvas” to open the drop-down menu.
- Look for “Drawing Guide” and toggle the button to the right. Your grid is activated and automatically appears as a fixed overlay on your canvas.
To make adjustments keep reading…
How to Adjust Your Grid Settings in Procreate
To access your adjustment settings first tap the “Edit Drawing Guide” button under “Drawing Guide” in the Actions menu. A new page opens called “Drawing Guide”.
Most adjustments can be found at the bottom of the screen, with one exception, the thin color slider is at the top.
How to Adjust the Size of Your Grid.
It’s very likely that your grid will need adjusting to a more convenient size. This can be done easily in the drawing guide settings.
- Tap the wrench icon and the canvas icon as before but this time tap “Edit Drawing Guide”
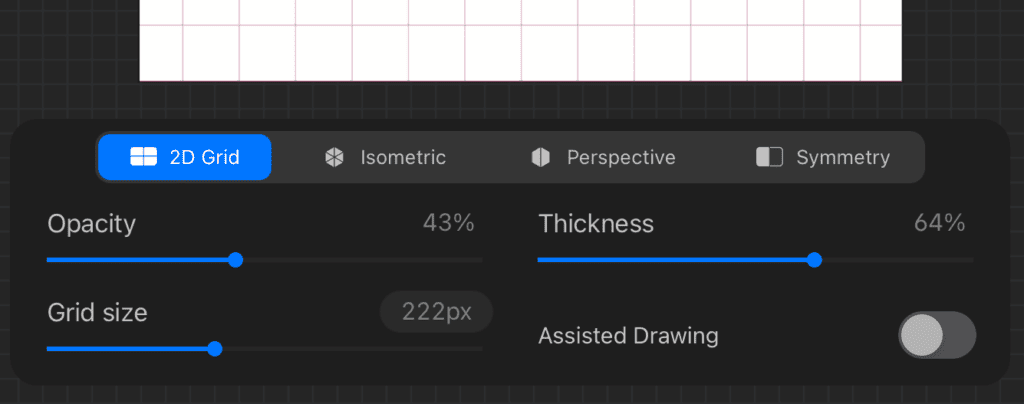
- It opens a new window called “Drawing Guides” with a set of 4 tabs and slider settings below. You need to choose the “2D Grid” tab on the left.
- The “Grid Size” slider is at the bottom left. Slide it to the left to reduce the size of your grid and to the right to enlarge your grid.
- Tap the “Done” button at the top right of your screen if you are finished, otherwise continue with your adjustments.
How to Adjust the Thickness of Your Grid Lines
You may find that your lines are too thin or too bold. It’s an easy fix.
As we did before when we tapped the “Edit Drawing Guide”, you’ll see the “Thickness” slider on the right-hand side.
Slide it back and forth to adjust the line thickness. It is measured as a percentage from 0 – 100%. Tap “Done” to apply the changes or continue.
How to Adjust the Opacity of Your Grid Lines
Continuing with the theme, the “Opacity” slider is on the left-hand side, and works in the same way. It’s all intuitive. Again the opacity is measured as a percentage, zero being invisible.
The “Isometric” grid settings work in exactly the same way should you wish to use them.
This explains opacity in full: How to Change Layer Opacity in Procreate: Step-by-Step
How to Adjust the Color of Your Grid Lines
Sometimes it’s useful to change the color of your grid lines. This is especially useful when your grid lines are the same color as the image beneath.
You will notice a multi-color bar at the top of the “Drawing Guides” screen. It’s a color slider.

It’s not immediately obvious that it’s a tool and it’s positioned too close to the “Done” button. It’s a clumsy design feature but functional nonetheless.
Personally, I can only envisage using this tool to turn the grid white over a black background.
How to Position Your Grid in Procreate
It is possible to rotate and move your grid to any position using the node points (handles)
Staying inside the “Drawing Guides” window, you’ll notice a blue node in the center of your canvas and a green node directly below positioned on the bottom edge.
The blue node will move your canvas, while the green node will rotate it.
Hold your stylus or finger down on the blue node to move it anywhere on the canvas. Drag and hold. Releasing your finger with save the position.
Likewise, hold your finger or stylus down on the green node to rotate the grid. Release your finger to set the new position.
If you wish to start again, there is no need to readjust the settings by hand and eye.
Each node can be reset individually. Tap the node and a “Reset” dialog box appears above. Tap it to reset the default position.
Each node is independent of the other so if you wish to reset everything you must reset both.
Why Would You Use a Grid With Procreate?
There are 3 obvious reasons why you would use a 2D grid:
- Proportions: Most people use a grid as a drawing aid. It helps you to create more accurate proportions and align all the different features. It’s a shortcut to an outcome. Depending on your skill level it can save a lot of time and heartache.
- Composition: A grid can assist you to visualize your composition. For example, you can divide your image or canvas into thirds, vertically and horizontally. That will give you a compositional grid to apply the rule of thirds to your artwork.
- Design: Having a grid is useful if you trying to lay out a design and wish to place elements in a coordinated, visually appealing, and balanced way.
An isometric grid can help with very basic perspective but it’s better, and more true to life, to set a vanishing point in the Perspective tool.
Using Drawing Assist with Your Grid
If you need to draw straight lines over your grid, you can use the “Drawing Assist” setting to make life easier.
You will find the tool in two places:
- Open the Actions Menu via the wrench icon
- Tap the “Canvas” icon
- Tap “Edit Drawing Guide”
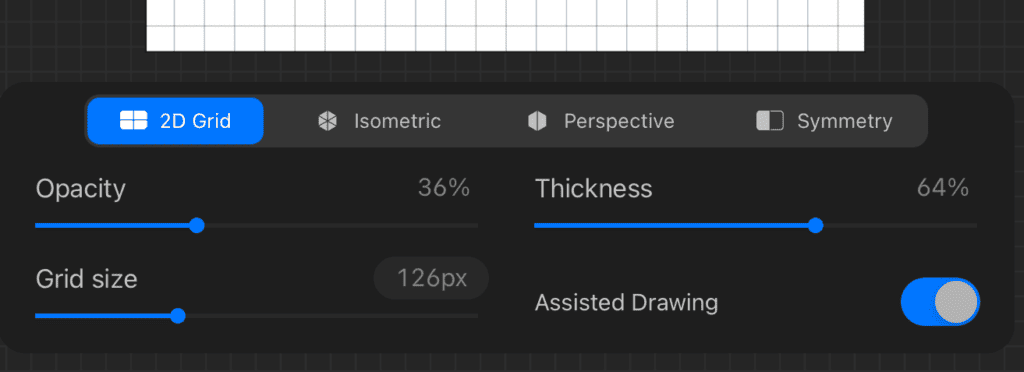
- Toggle on “Assisted Drawing” at the bottom right.
Alternatively, you will find the command in your layers panel:
- Tap the “Layers” icon (2 blue squares overlapping) at the top of the screen
- Tap an existing or new layer to open the side menu
- Check “Drawing Assist”
Drawing assist will allow you to draw vertical lines and horizontal lines only. It’s easier if you use an Apple pencil but you can use your finger if you’re careful. Tap the screen with two fingers to undo any errors.
To draw a diagonal line you’ll have to uncheck the tool or open a new layer. Each layer is independent of the others.
I use grids to accurately map out super realistic traditional art from my reference photographs. Grids suit my style of work but it comes in useful even when your style is loose and more expressive. I’ll give you an example.
Few professional or part-time artists are free to please themselves, and accepting commissions is the norm.
Most commissions require a lifelike representation of a family member or a beloved pet. Portraits must look like the sitter. If that stretches your natural ability or takes too long to complete, it makes sense to use a grid to aid you. Why leave money on the table?
Why struggle? Just grab a course and follow along. This is the most popular Procreate course on Udemy
Can You Print a Grid in Procreate?
Not by using the drawing guide grid. It’s a failing in my opinion. There is a way to do it, you must import a grid into procreate and use a layer.
This will go into more detail: How to Print From Procreate: Your Step-by-Step Guide
You can download your file to your iPad via Dropbox or Drive. The alternative is to store your file on iCloud.
- Open an image or create a new canvas.
- Tap the wrench icon to open the “Actions” menu
- Tap on the “Add” icon at the top left; it’s a double box with a plus sign.
- Tap insert a file
- Import from “iCloud” or “on my iPad”
You need a PNG file of your grid with a transparent background. This will be the top layer when you decide to print your work.
Your grid will open as a selection layer via your transform tool (diagonal arrow in a circle). Make adjustments by pinching the screen, in and out, with your finger and thumb. Rotate the grid using the circular node at the top.
Remember that all your mistakes can be undone with a two-finger tap on the screen.
There are different ways to undo mistakes: How to Undo in Procreate: Plus Redo Gestures (2023)
How to Create a Grid on Procreate: Final Thoughts
Imagine drawing a grid the old way, I did that for years. With digital drawing that chore is finally over. Now adding a grid in Procreate is the easy bit.
Follow the simple steps outlined in this guide and you’ll be able to create your digital art and designs more quickly, gain confidence, and produce better designs.
This post has covered everything a Procreate beginner needs to know about grids.
To learn more about Procreate basics check out the following options:
- Is The Procreate App Worth it For Beginners? Get the Facts
- Is it Worth Buying an iPad for Procreate?
- How to Make Straight Lines in Procreate: Step-by-Step
- How to Make a Stamp Brush in Procreate: Step by Step
- How to Use the Symmetry Tools in Procreate: Step-by-Step
- Do You Need an Apple Pencil for Procreate? I Found Out
- Does Procreate Work on iPad Mini 5? What You Need to Know
- How to Use Layers in Procreate: 15 Essential Tips and More
Or learn the basics of digital drawing with Brad Woodward on Domestika. I promise you this course is easy to follow. I took it myself.

I wrote about Domestika too: Is Domestika Worth It? The Pros and Cons
This is my guide to selling art prints face-to-face in an art market
Pin it and Save it

Hi, I’m Kevin Hayler
I’ve been selling my wildlife art and traveling the world for over 20 years, and if that sounds too good to be true, I’ve done it all without social media, art school, or galleries!
I can show you how to do it. You’ll find a wealth of info on my site, about selling art, drawing tips, lifestyle, reviews, travel, my portfolio, and more. Enjoy

