

If you want to know how to shade a black background, the main problem is getting a deep, even black without patchy areas, or that annoying graphite shine.
It sounds simple. You’re only filling in the background, after all. In practice, large areas of solid black can be a pain to draw well. Every uneven patch shows, and the darker you go, the more problems occur.
In this drawing guide, I’ll show you how I draw backgrounds, how I avoid the common problems, and how I correct things when they go wrong.
Let’s begin
Disclaimer: When you buy something via my affiliate links I earn from qualifying purchases and sometimes earn a commission, at no extra cost to you. I am an Amazon Associate among others. I only recommend trusted sites.
What Art Materials Do You Need for Drawing Black Backgrounds?
You don’t need any special materials to draw a black background. Your choice of pencils and paper will have the biggest effect on the result.
I prefer to build up graphite slowly in layers. I rarely use anything darker than a 3B pencil because softer graphite is more likely to produce pencil shine.
For looser backgrounds, I use ordinary graphite drawing pencils. When I need more precision, I use 0.3mm mechanical pencils, usually no darker than 2B.

This Will Help: Best Drawing Pencils for Beginners: How to Choose
That suits the way I work. I draw slowly and at a fairly small scale. If you work larger or use different drawing techniques, you might prefer something else.

Read this: The Best Mechanical Pencil for Artists
For blending, use paper blending stumps, tissue, and a chamois leather cloth. A chamois is especially useful when you need to blend a larger area.
For corrections and fine details, I use a kneaded eraser, a Tombow Mono pen eraser, and a battery eraser. They each lift graphite in different ways, so it’s useful to have all three at hand.

And this: Best Erasers for Drawing: The 9 Eraser Types for Artists
Your choice of paper makes a huge difference too.
Bristol board will give you the smoothest black background because it has very little texture. The drawback is that it doesn’t hold as much graphite, so getting a really deep black can be difficult.
A grainier paper with plenty of tooth holds more graphite. That makes it easier to build up a rich, dark black. The trade-off is that the texture makes it harder to get a perfectly even tone, and the dreaded pencil shine.
There’s no single best combination. Your materials depend on the effect you want, the scale you work at, and how much control you need.
How Do You Draw an Even Black Background?
I draw an even black background by building up the graphite in a series of light, controlled layers. I don’t press harder to make the tone darker. I keep the pressure light and add more layers instead.
My main shading technique is cross hatching. I shade the whole area with parallel diagonal lines in one direction, then reverse the direction for the next pass. I keep repeating the process until I build up the depth of tone I want.

The grainy effect in the background is the fine tooth of the paper.
I also shade with the pencil held at a shallow angle and use a chamfered edge on the lead. This allows the pencil to glide over the paper instead of digging into the surface.
The trick is to take your time. Keep your strokes regular, maintain a light touch, and gradually fill the tooth of the paper. Scribbling in different directions makes it much harder to get an even black tone.
If some areas are still too light, work over them again. Don’t compensate by pressing harder. That damages the paper surface and makes mistakes much harder to correct
Should You Draw the Black Background Before or After the Subject?
Ideally, you’ll know from the start that you want a dark background. I prefer to add it in the early stages and gradually make it darker as the drawing develops.
This allows the background and subject to evolve together. You can judge your tones, edges, and contrast as you go instead of trying to make a finished drawing fit a new background.

Adding a black background as an afterthought creates more problems. It can change the whole character of the drawing, and there may be a mismatch between a finely drawn subject and the looser background you were hoping to add.
There’s another problem. Once you’ve spent hours finishing the subject, it’s very easy to get precious about it. You become afraid of ruining the drawing, your approach gets timid, and adding the background becomes much harder than it needs to be.
My advice is to establish the background early, keep it fairly light to begin with, and build up the darker values alongside the rest of the drawing.
How Do You Correct Mistakes in a Black Background?
If your black background looks patchy, don’t automatically add more graphite. Sometimes the problem is a dark mark where two areas of shading overlap.
I use Blu Tack to correct these patches. Knead it into a very fine point and brush it extremely lightly over the darker mark. It lifts the surface graphite without removing the shading underneath. You can gradually fade the mark until it blends into the surrounding tone.
For larger corrections, use a kneaded eraser to lift the graphite gently. A Tombow Mono pen eraser or battery eraser is better when you need more precision.

The important thing is to avoid rubbing hard or damaging the paper tooth. Make the correction gently, then rebuild the shading in light layers until the repair disappears.
How Do You Stop Graphite Shine in Black Backgrounds?
Graphite shine is difficult to avoid completely, but you can keep it to a minimum. The biggest mistake is trying to force a deep black by using very soft pencils and pressing harder.
I seldom use anything darker than 3B. For precision work, I use 0.3mm mechanical pencils with 2B leads. I build the dark tones gradually with layers of controlled cross hatching.
Keep your pressure light. If you press too hard, you flatten the tooth of the paper and burnish the graphite. At that point, the background stops getting noticeably darker and starts getting shinier instead.
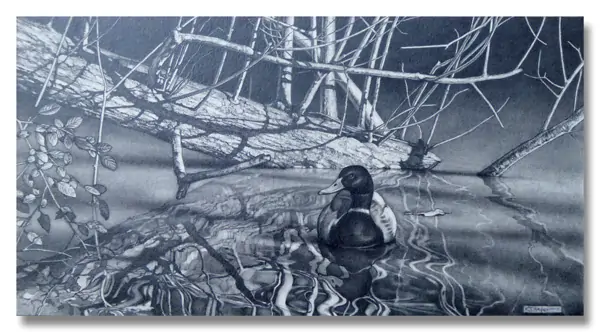
Build up the layers until the tone reaches its limit. If you need a deeper, matt black than graphite can give you, you’ll need to consider another medium, such as charcoal or a carbon-rich pencil.
A slight satin sheen is normal with graphite. The aim isn’t to remove every trace of shine, it’s to stop it becoming distracting.
This is Comprehensive: 9 Ways to Stop Pencil Shine in a Drawing and Save Your Work!
Can You Combine Charcoal and Graphite?
Yes, you can combine charcoal and graphite, if you are careful.
Charcoal has one big advantage. It gives you a much flatter, matt black without the shine you get from heavy layers of graphite. It’s also very quick to apply.
The problem is that the two mediums behave differently. Charcoal is softer, dustier, and much easier to smudge. It can also look noticeably different beside graphite, so the transition needs some care.
You won’t notice much with the harder pencils, they blend with charcoal well. You will notice it more with ‘B’ pencils. Graphite ‘black’ is richer and reflects light.
One option is to use graphite for the detailed areas close to your subject and charcoal for the larger areas of black background. This gives you the control of a pencil where you need precision and the deeper black of charcoal elsewhere.
To add yet another complication, mechanical pencils don’t blend with normal graphite either. Mechanical pencils contain a polymer that produces and greasier mark. The darker grades do not mix with darker grades of standard pencils.
Test the combinations on a scrap of the same paper first. Different papers and pencil grades can produce very different results, and it’s much better to discover that before you try it on a finished drawing.

Do You Need to Fix a Charcoal or Graphite Background?
You don’t need to use fixative to seal a graphite background. Graphite binds well to the paper and there’s little advantage in spraying it.
Charcoal is different. It sits more loosely on the surface and smudges easily, so fixative has its uses. There’s some merit in giving a finished charcoal background a very light spray, but be aware that fixative can alter the tones, darken areas, and change the overall appearance.
You can also use fixative during the drawing process. Spray a light coat to seal a layer of charcoal, let it dry, then apply more charcoal over the top. Pastel painters often use this technique to build up their work in layers.
There’s an important catch. Once you’ve fixed a layer, you can’t erase it. You’ve effectively locked that part of the drawing in place.
If you decide to use fixative between layers, you need to plan for it from the start. It becomes a different drawing technique rather than a simple way of protecting the finished picture.
Always test your fixative on a scrap of the same paper first. You need to know how it affects your charcoal and tones before you spray the actual drawing.
A Detailed Post: How to Protect and Preserve Your Pencil Drawings Properly
How Do You Add White Lines Over a Black Background?
If you need to add whiskers, hairs, or other fine white lines over a black graphite background, I prefer to erase them out rather than add white on top.
My favourite tool is a battery eraser. I sharpen the rubber nib to a very fine point using a craft knife and fine emery paper. Used carefully, you can erase incredibly fine lines through the graphite. Keep sharpening the nib because the point wears down quickly.

A Tombow Mono Zero eraser pen works well too. I cut a fine edge into the rubber tip and swipe it across the graphite. It’s particularly useful for building layers of fur and hair.
The other option is to indent the paper before you shade it. The graphite passes over the groove and leaves a crisp white line. It works, but you must plan the lines in advance, and mistakes are difficult to correct because you’ve physically marked the paper.
I prefer erasing because I can add the details near the end. If a whisker or hair goes wrong, I can pencil over it and try again.
The only time I’d use a white pencil over dark, is on charcoal. It works but it’s very hard to draw consistently thin lines.
This is a Good Post: How to Draw White Lines in a Pencil Drawing (Without Going Mad)
How to Shade a Black Background: Final Thoughts
Learning how to shade a black background is mostly about patience and control. Don’t try to force the graphite to go darker by pressing harder. Build up the tone gradually with light layers of cross hatching and preserve the tooth of the paper.
Ideally, plan your dark background from the beginning and develop it alongside the subject. You’ll find it much easier to balance the tones and make corrections before you’ve committed yourself to a finished drawing.
Graphite has its limits. If you want a very deep, matt black, charcoal may be a better option. Whichever drawing method you choose, test your materials first and take your time.
A black background is simple in theory, but getting one smooth, dark, and even takes careful drawing practice. Once you understand how the pencils, paper, pressure, and layering work together, the process becomes much easier to control.
If you need more help with drawing, then I urge you to check out
Dorian Iten on Proko. His course is reasonably priced and inspiring
These Posts will Interest you too:
- Is Drawing from Photos Bad? Are you Cheating?
- 32 Drawing Mistakes and Bad Habits Artists Must Avoid
- How to Draw Realistic Shadows in Pencil: Light and Shade
- How to Draw Water in Pencil: Drawing Water The Right Way
- Drawing Realistic Grass the Easy Way: For Beginners
- How to Scale Up a Drawing in 4 Easy Ways and Save Time
- How to Plan and Compose Your Art (A Guide for Beginners With Examples)
PIN THIS


Hi, I’m Kevin Hayler
I’ve been selling my wildlife art and traveling the world for over 20 years, and if that sounds too good to be true, I’ve done it all without social media, art school, or galleries!
I can show you how to do it. You’ll find a wealth of info on my site, about selling art, drawing tips, lifestyle, reviews, travel, my portfolio, and more. Enjoy