
Kevin Hayler: Professional Wildlife artist, author, and traveler.
If you want to learn how to draw faster this article is for you. I’m going to teach you how to draw faster using 14 tips and tricks I’ve learned from 20 years of drawing professionally.
Let’s make a start.
Disclaimer: When you buy something via my affiliate links I earn from qualifying purchases and sometimes earn a commission, at no extra cost to you. I am an Amazon Associate among others. I only recommend trusted sites.
1. Sketch Faster by Drawing From Life
An excellent way to improve your drawing skills is to draw a street scene. You can use the static simple shapes of the buildings as a backdrop, with the road and paving providing your deadlines.
With the structure quickly mapped out, rapidly add the people passing by to add some dramatic narrative.
Forget about drawing detail. This is line work.
Realistic Portrait Drawing by Stephen Bauman
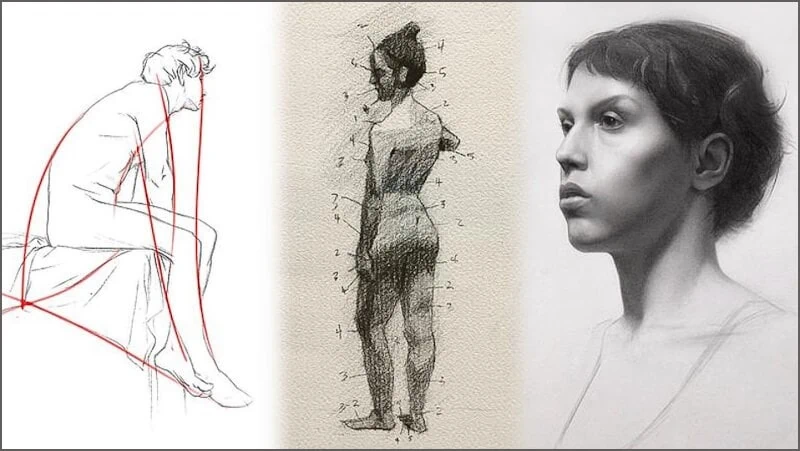
2. Draw Faster by Simplifying Shapes and Forms
All artists draw using the same basic principles. You start off with the boldest, most basic shapes and refine them down into progressively smaller shapes until you get to the detail.
This process of drawing serves two purposes, to map out the initial shapes as a rough sketch first and to adjust the proportions accurately, at the earliest stage possible.
This is the most critical part of the drawing process. The last thing you want to do is correct the proportions at a later stage in the drawing. That is making work for yourself and besides, when you go too far along the wrong path you get possessive about the good parts and try to preserve them.
This invariably fails.
You can ‘cheat’ in the studio by tracing and measuring, but you will benefit most by learning these art skills from life first.
3. Draw Faster by Blocking in and Lifting Out
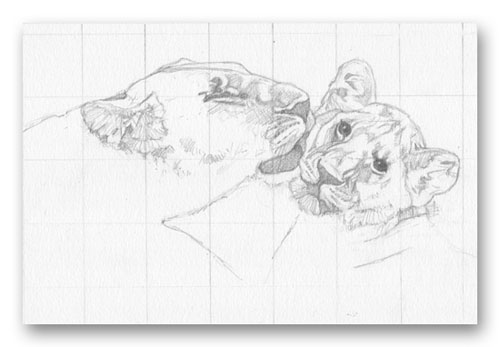
As you learn to draw the simplest shapes you can block them in further with some basic shading.
Do yourself a favor and draw subjects with high contrast and strong shadows. The shapes will be easier to discern. All artists look for the strongest shapes. When you have some experience you’ll appreciate how dramatic lighting speeds up your drawing immeasurably.
You can learn: How to Draw Realistic Shadows in Pencil (All The Best Secrets)
Having shaded your outline drawing into bold tonal blocks, try gently lifting out the lighter areas with an eraser.
Beginners are impatient to get on with things and start drawing too early. This is a mistake. It’s OK to have an ugly underdrawing. These are only foundations.
It is far quicker to lift out tone than to draw it in. It may not be photographic, but that’s not the purpose. It will look more painterly, have more atmosphere and take less time, and that’s the point.
Graphite can be gently lightened by dabbing the paper surface with a USED kneadable eraser or piece of Blu-Tack. Put simply, a clean new eraser will lift more graphite from the page, and a ‘dirty’ eraser lifts less. To make subtle adjustments your eraser must be grey with old graphite.
I roll the eraser or Blu-Tack into a ball, slightly flatten one side and tap the graphite until I have the right tone. If I go too far, I can shade it back in and do it again.
If your eraser is brand new, scribble your pencil onto a piece of scrap paper, or emery paper, and press the ball onto the surface. Dab the eraser onto clean paper a few times to transfer the excess graphite, before dabbing your drawing.
Lighten by dabbing, erase by rubbing.
Remember the detail comes last.
4. Don’t Correct All Your Drawing Mistakes
The key to drawing fast and loose is to draw several lines lightly and define the most accurate. That’s the secret of quick drawings.
Embrace your mistakes and use them to discover the best lines. Your sketch will benefit. Let the viewer see the process, it adds drama, life, and movement to the scene.
Use these tips: How to Make Your Drawings Interesting: 14 Ways to Improve a Drawing
Boring subjects can be brought to life with a vibrant, and fluid, use of lines. Far from getting in the way, they emphasize the beauty of your art style.
Your mistakes add character to an otherwise bland subject.
5. Know When to Stop Drawing
I have a character flaw – I’m a perfectionist. I will draw a simple sketch, over and over, until my simple sketch has the right kind of sketchiness! I know it’s crazy.
Listen, if you want to get quicker at drawing you must resist the temptation to add detail and finish things off. You will be digging a hole for yourself and I know that from personal experience, it gets harder and harder to climb out.

Nine times out of ten, your perfect drawing will not look any better than it was halfway through. You’ll be doubling your time and effort to achieve for almost no gain.
That begs the question: Is Hyperrealism Art or a Skill? What’s the Point?
In reality, the viewer is only interested in the main focal point, all the rest is padding. They are very forgiving about the outer edges. You can do what you like as long as the key area is good enough.
Many portrait artists draw the face brilliantly and only suggest the shoulders, hair, and body; WHY? Because it doesn’t matter. The viewer is only interested in the face.
I get obsessed about getting everything just right, and while I’m doing that, I’m beating myself up for taking so much time!
Do as I say, not as I do.
Before we move on, have you thought about making money with your art? I’ll show you how. Take a look!

6. Choose the Right Pencils and Drawing Paper
It’s all very well telling you what to do but it won’t work without the right sketching materials.
You need a softer-grade pencil for fast drawing. I use an HB or B usually, but many artists prefer something punchier like a 3B.
Read this post if you need: What Do Pencil Numbers Mean? Pencil Grades Explained + Charts
As I’ve said countless times, all brands are different. I use Derwent Graphic Drawing Pencils and their grades differ from other brands. It is a case of choosing a brand of pencils and getting to know them.

Hard pencils are useless for fast drawing. It might be tempting to use a light grade for drawing rough outlines but applying any pressure will score the paper and that can ruin everything before you begin.
I go no lighter than F in the Derwent range, and I use that only if I might add some watercolor washes. Generally, I sketch in HB or B and use cartridge paper that has some ‘tooth’.
That’s another variable you will have to consider. The paper surface will affect the tone. A smooth Bristol Board has no tooth for the graphite to bind onto, consequently, your line will be lighter.
Read this post if you want help: What’s The Right Paper for Pencil Drawing? (How to Choose Wisely)
Bristol board is perfect for beautiful seamless blending. You will be able to blend and draw at speed. It is particularly good for clean pen and ink drawings.
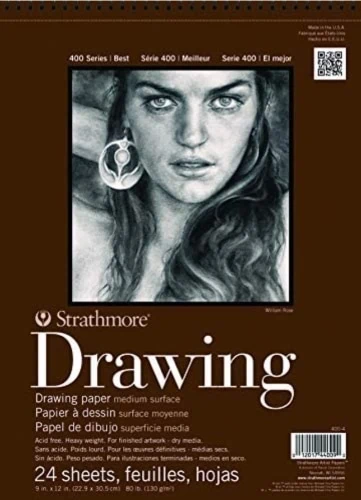
I like the middle ground and mainly use Daler-Rowney Heavyweight Cartridge Paper but if I lived in the States I would use the Strathmore series.
On occasion, I will draw on a coarser surface, I like to use Canson Mi-Teintes pastel paper. I use an off-white tint. There are two sides, I use the grainy side, the other has a criss-cross pattern.
What I love about heavy grain is the immediate atmosphere it lends to a drawing. Grainy pencil shading gains instant depth and interest without having to use different techniques. It looks and feels much more spontaneous.
7. Choose a Faster Drawing Medium
If speed is what you are after, it might be time to abandon conventional graphite pencils and start using different mediums, such as graphite stumps, powder, and charcoal.
Drawing with solid graphite can be messy but you can cover a large surface area with little effort. I don’t use them as often as I used to, but there was a time when it was an essential part of my kit. Why? Because I used to draw much faster than I do today.
When I first started to sell original work I wanted every piece of artwork completed within a day. If I took two days I would curse. Now I take a lot of time and must print them to make my money.
Graphite stumps create fantastic textures and I used them regularly before I moved over to try my hand at photorealism. I continue to use them, but more judiciously.
Graphite powder is useful for laying in a light undertone. You can blend it with a soft brush and lift it clean off the paper with an eraser. It takes a lot of getting used to and I don’t use it so much, simply because it goes everywhere.
Charcoal powder is another messy but beautiful way of applying tone. Anyone who has been to the Far East, and seen the portrait artists draw, will see them painting with charcoal dust as if they were using paint.
They dip their brushes into the charcoal powder and build the tones up in layers. The blending is so gentle that the paper doesn’t stain. The powder lifts away cleanly with an eraser.
Charcoal sticks are the original spontaneous drawing medium. You’ll get covered in charcoal but you’ll be forced to choose your lines with confidence and draw using your whole arm. The medium dictates how you draw.
I usually advise artists not to use their fingers to smudge their drawings for fear of leaving greasy marks on the paper. Ignore that advice with charcoal sticks. They demand that you get dirty and blend with your fingers.
You can shade whole backgrounds in a few strokes. Hair can be blocked in and shadows are drawn in moments. In the hands of an expert, charcoal is unsurpassed in its immediacy and subtlety of tone.
For most of us, it’s usually a disaster!
Now you must bear in mind that there is intentional smudging for artistic effect and unintentional smudging that ruins all your hard work.
This is how you: Prevent Your Drawings From Smudging: The Ultimate Guide
8. Draw Quickly From the Arm and Elbow
Your drawing technique will have a direct bearing on your ability to draw quickly. When you draw from the wrist you’ll inevitably slow down and draw with more care and precision. That’s fine in the final stages of a detailed drawing, but not for sketching the rough outlines.
You’ll draw much more quickly from the arm. You’ll need to have the paper at an angle, or upright at an easel, and that way you can step back and see the perspective properly. It’s easier to draw loosely on a larger scale.
A loose arm action will allow you to draw with dynamic movement. The line quality will improve flow across the page and your quick arm movements will allow you to flick, dab, and smudge freely.
You won’t have to worry about being distracted by detail because you simply won’t be able to do it.
9. Practice Fast Gestural Drawing
Gestural drawing is just a fancy way of describing a drawing with movement. The idea is to draw a figure or animal in various positions.
Comic illustrators are experts at gesture drawing. They have the visual memory and basic knowledge of anatomy to improvise drawing a figure in any position. It’s a skill that can be learned with practice.
You can learn from life classes if they are informal enough to let you sketch freely, alternatively, there are mannequins you can buy and pose in any way you like.
If you need more help with drawing, then I urge you to check out
Dorian Iten on Proko. His course is reasonably priced and inspiring
Another way of quickly drawing gestures is to draw a basic skeleton and flesh it out. You need to know the basic skull shape, breastplate, and hips. As long as the limbs are the right length you can add the muscles with quick ellipses.
You need a basic idea about anatomy, but that’s possible with a few references to help you figure things out.
The advantage you will gain from gesture drawing is the visual memory you will develop. If you draw regularly you will be able to guess and draw any missing detail with more conviction.
It’s very handy should you want to change a pose for dramatic effect. You have enough knowledge not to be a slave to photographic references.
10. Draw Negative Spaces to Speed Things Up
Looking for negative spaces helps you to see shapes in different ways. When you draw, you’re not only looking at the spaces within your subject, but you are also visualizing the spaces around your subject.
Imagine an animal running, let’s use my image of the zebras below. The negative shapes are the strong spaces between the limbs. It’s just as important to draw negative space as it is the main (positive) space.
You can also use the same method to draw the stripes. Are they black over white or white over black? In fact, it doesn’t matter as long as you treat both areas as just shapes and draw them in proportion.
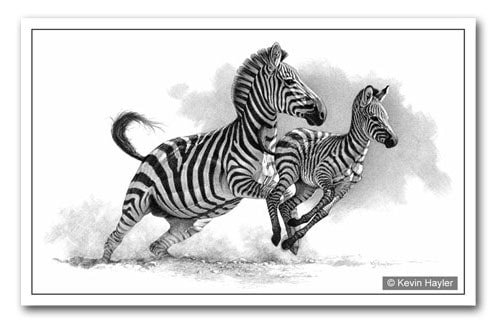
Drawing a combination of negative and positive spaces will speed up your drawing and help you to get the spatial relationships in balance.
11. Work on Several Drawings at Once
It worked for JMW Turner. He would work on multiple paintings at a time. He had a conveyer-belt approach that increased his output, and his income. He also happened to be a genius and that helped.
I’m not a genius and I can’t multi-task, so it’s not a technique I’ve ever used to increase my productivity. I can only draw one thing at a time. I can put a drawing to one side but I will not return to it if I start a new drawing. Not for a long time.
If you can switch focus between several images at any one time, I can see the benefit. In theory, you would look at each drawing with fresh eyes every time you come back to it.
The same thing happens when you walk away for a few hours and revisit any drawing. With fresh eyes, you can see obvious mistakes that were not apparent when you were lost in the process.
If you step away long enough to forget about the anxiety of going wrong, you can return to the work with a bolder approach. You’ll stop worrying about the time and emotional investment that you put in and just crack on with fixing it.
Here are a few more tips to help: How to Get Better at Drawing: 15 Ways to Improve Your Art
I can’t see how the J.W. Turner production-line approach would work for me, or for most artists, but I can imagine how returning to a drawing every few days could be a good idea. It might speed up your work, and prevent you from getting bogged down.
12. Use a Toned or Tinted Ground for Quicker Drawings
Using a toned, or tinted, ground for the mid-tones is a great way of increasing your drawing speed. It’s an age-old device. You can layer a white page with a flat-ish grey tone or use pre-made tinted paper.
You can layer a tone with a soft brush dipped into graphite or charcoal powder. In the Far East, they use very wide brushes to layer a soft tone in minutes. I’ve seen artists use makeup brushes in the same way. You can also experiment with layering a mid-tone with Panpastel colors.
If you are drawing on watercolor paper or board, you can use a gouache wash or diluted Indian ink.
It’s far easier to buy your paper ready-made. Strathmore sells mid-grey and tan sketching pads. The 400 series is very thin but great for practicing your techniques. For serious work, you might prefer the 500 series.
A toned ground has a number of advantages. It removes the need to draw all the mid-tones yourself, it binds the image together into a cohesive whole, and it teaches you the importance of using highlights to give the drawing true depth.
13. Trace or Grid Your Drawing
It may be sacrilege to purists but tracing has been used for centuries. The assumption that great master artists did everything by eye and skill alone is a myth I’m afraid.
Time was money in those days, just as it is now, and any shortcuts toward a quicker outcome were acceptable. The end result was what really mattered.
You only have to look on Instagram to see how many professional artists are using a traced image at the early stages of a drawing. Some mention it, many don’t. Let’s face it, there is a stigma attached to tracing.
There’s no doubt that tracing a reference photo will dramatically speed up your drawing but there is a downside. It’s crude, clumsy, and stilted. It has no artistic merit beyond being a quick scaffold, waiting for the paint or detail to be applied.
There is nothing ethically wrong with that in my book because it still takes a very good artist to bring the art to life. Drawing over an initial tracing and constructing a sense of motion is not easy.
You can dive deeper into tracing and gridding here:
- Tracing Art – Is It Good or Bad? When Is Tracing Cheating and Is It Ever OK?
- Is Drawing a Grid Cheating? – Do Real Artists Use Grids?
- How to Trace a Drawing: 12 Ways to Get Results – Fast!
Tracing a photo makes you feel uncertain. It’s almost impossible to know what to draw in and what to leave out. Inevitably you draw everything you can, just in case you miss something important.
You lose your spontaneity. It becomes an illustration, which is fine, but you lose the artistic flourish of freehand drawing.
It’s a trade-off.
Now before you wag your finger at me, I use a grid to draw my illustrations. It’s no better than tracing really because it has the same inhibiting effect.
I still have to labor away to try and recapture the life and soul that attracted me in the first place. It is much slower than tracing but faster than drawing freehand. For me at least.
Plus, very few people see it as cheating.
Download Your Grids for Free. No Catch
14. Use Dividers as a Drawing Aid
Dividers allow you to measure two points on an image and mark those points out on the drawing paper. It’s simple measuring. You can draw any photographic image to the same scale

Proportional dividers are pivoted along a slider and that allows you to draw at a different scale. You line up two points with one end and measure out a larger or smaller version with the other end.
Good dividers are cheap enough, good proportional dividers are more expensive. I like to print an image to the required scale and use normal dividers.

The image above shows wooden dividers. I found they were too big and clumsy for my style of work. I would urge you to consider using metal dividers for preision control.
For more info about using dividers read this: How to Scale Up a Drawing in 4 Easy Ways to Save Time
In theory, you can get stuck in without any preparations but it might be easier to draw one horizontal line crossing an eye and one vertical line at 90 degrees.
You must draw two IDENTICAL guidelines on your drawing paper very lightly.
These are your anchor lines. If one eye is lower than the other you can see it clearly. You can use the fixed lines to double-check and cross-reference that your angles are correct between any two given points.
This method allows you much more freedom to draw naturally. You are taking out the trial and error but retaining the sketchy, artistic feel.
TIP: The dividers must have a tight mechanism, or buy a precision compass with an adjustment wheel
You tick off the crucial points of the drawing such as the distance between the eyes, the tip of the nose, and the mouth, and draw them all, knowing they’re in the right position.
Dividers allow you to draw freehand within a simple framework and any errors can be corrected by measuring.
It’s a good way to draw faster.
How to Draw Faster: Final Thoughts
Who doesn’t want to draw faster and get more work done? We all do right? It’s not just commercial artists who want to be more productive. Time matters to everyone and if you are anything like me, you have more ideas than time in the day to do them.
The faster you can draw, the more art you can create. Find a method that works for you and experiment with different techniques and see which ones help you achieve your desired results.
These 14 ways to speed up your drawing are pragmatic solutions to the problem.
Now get your sketchpad ready and make a start.
If you like the way I draw and want to know what I use, This is my basic kit

If you want to sell your drawings I can help. You should really take a look at my guide. I will take you by the hand show you how. Take a look!

If You Want to Sell Your Art
Check this out!
Psst…it’s only $12.99!
Here are some related articles that will interest you:
- Drawing Prompts: 55 Useful Ideas and Techniques
- 9 Ways to Stop Pencil Shine in a Drawing and Save Your Work!
- Is Drawing From Reference Photos Bad? Are You Cheating?
- Drawing Ideas for Adults: 120 Cool and Easy Things to Draw
- Can You Copy Art and Sell a Painting of a Painting?
- How to Draw Realistically: 11 Expert Tips For Superb Results
- 7 Types of Contour Drawing Explained: Quick and Easy
Pin For Later


Hi, I’m Kevin Hayler
I’ve been selling my wildlife art and traveling the world for over 20 years, and if that sounds too good to be true, I’ve done it all without social media, art school, or galleries!
I can show you how to do it. You’ll find a wealth of info on my site, about selling art, drawing tips, lifestyle, reviews, travel, my portfolio, and more. Enjoy