
You buy or download an art print. Then what? You don’t know how to frame it so you grab a cheap frame or trim the print to fit. It looks terrible. The borders are wrong, the edges look sloppy, it’s a mess.
The whole thing feels cheap and nasty.
Sound familiar? Most art prints don’t match standard frame sizes. When you force them to fit, the art loses its impact. The frame doesn’t help, it just makes the print look worse.
This article shows you how to frame cheap art prints so they look expensive. You won’t need custom framing. You won’t need special tools. You’ll use a simple method that makes your new art print look POSH!
Disclaimer: When you buy something via my affiliate links I earn from qualifying purchases and sometimes earn a commission, at no extra cost to you. I am an Amazon Associate among others. I only recommend trusted sites.
The Cheap Way to Frame an Odd Size Print
Most art prints don’t match standard frames. A 6 by 11 print won’t fit an 8 by 10 frame. So you crop it or force it to fit. It looks worse than an empty wall!
The cheap fix is a custom photo mat. A mat is the board with a window cut in it that sits between the print and the frame. It changes the size of the print by adding a generous border.
The wide mat lets you present an odd size print into a standard frame size. You don’t need to crop the image. You just place the art upper center as I will explain.
The mat also makes the print look professional. It adds space around the image. It makes the art feel planned, balanced, and hides rough edges
This works because off-the shelf frames are cheap and online mats are cheap too.. Custom frames cost a lot because everything is built to fit the art. Great for originals of premium prints but way over the top for a cheap print.
With this method, only the mat is custom. The frame stays standard. That’s how you get the expensive look without paying through the nose for it.
Measure Your Art Print
Lay your print on a flat surface. Don’t rush this part. A bad measurement leads to a bad frame.
First, look at the edges of the image. If the printed edges are clean and even with plenty of white paper to play with, don’t measure to the image itself. Leave a white border around it. Aim for about 1 cm or about 3/8 inch on each side. This small borderline makes the print look professionally placed.
When the mat aperture (window) borders the image exactly, the image looks pinched. More space is better design.
Only measure to the edge of the image if the borders are so narrow, uneven or crooked that you have to hide them.
Write down the width and height of what you want to show.
If you have enough paper for a white border, it will be the image size plus the border width.. So if the width is 12 inches (30cm), you would add 3/8″ + 3/8″ (1cm + 1cm) to the size. you’d do the same for the height.
Otherwise measure the image minus about 1/8th” to ensure a tight fit. Best if the window is slightly smaller than risk it not fitting properly.
These numbers control everything that comes next.

Take a closer look at these 2 jaguar prints. The one on the left is centered. The top and bottom borders are wider than the sides.
If you look at the jag’ on the right you’ll notice the top and sides of the mat are the same width, but the bottom is wider. This works very well, but it might be harder to order it online.

Choosing a Standard Frame Size
Now find a standard frame that’s bigger than your art. You want about a 2 inch (50cm) border around the image on all sides as the minimum.
Don’t be tempted to buy a smaller frame even if it fits. A professional frame has wider borders.
Start with the size of your print. Add 2 inches to the left and right. Add 2 inches to the top and bottom. This gives you the size your mat opening area needs to sit inside.
Here’s a simple example.
If your print is 4 × 7 inches and you want a 2 inch border all around it, the new size becomes 8 × 11 inches.
Now look at standard frame sizes. An 8 × 11 opening won’t fit inside an 8 × 10 frame, so that won’t work. The nearest standard size that will fit is 8 × 12 inches. That’s the smallest frame you should use for this print.
You can go bigger if you want. The only rule is this. The frame must be larger than your artwork plus the 2 inch border on every side.
Order a Custom Matboard
Now you can order the mat to fit your frame.
You will see two sizes when you order. The outer size and the opening size.
The outer size must match the frame. If your frame is 8 × 12 inches, the mat must also be 8 × 12 inches.
The opening size is based on what you decided to do in Section 3.
If your print has clean edges, you already allowed for a small white border around the image. Use that measurement for the opening size.
If you decide not to have a white border it makes more sense to make the aperture 1/8″ smaller so the mat overlaps the printed image. Reduce the width and height by about 1/8 inch total. This helps hide tiny alignment errors.
Matboard Options
When you order a mat, you’ll see several choices. These affect how the picture looks.
Mat quality
You’ll usually see economy, or archival (acid-free). Economy is fine for most cheaper printed art. Conservation or archival is best for original art or anything you want to keep for many years.
Mat core color
This is the color inside the cut edge of the mat. Most mats have a white core. You can also choose a black core. A black core creates a thin dark line around the image. This works well with black and white or monochrome art. It can make the image look classy.
Mat thickness
Most mats are standard 4 ply thickness. You can also choose a thicker 8 ply mat. A thicker mat adds depth and makes the frame feel more solid and more expensive.
Double mat
You can add a second mat under the first one. This creates a thin line of color around the image. You can use a second color for contrast or the same color for extra depth.
Go easy. Too many effects can make the frame look busy instead of clean.
Assemble the Frame
Lay your print face up on a clean surface. Don’t put the mat down yet.
Attach two small pieces of low tack, acid free tape to the back of the print along the top edge. These are your hinges. They hold the print in place but still let it move.
Now place the matboard over the print. Line up the opening so the borders are even on all sides. Take your time here. This step controls how the final frame looks.
When you’re happy with the position, press the mat down onto the tape hinges. The print is now fixed behind the mat.
If you get it wrong, peel the print away and try again. That’s why you use low tack tape. It lets you reposition the print without tearing the paper.
Clean the glass. Put the glass in the frame. Add the matted print. Add the backing board and close the frame. Check for dust before you seal it.
Standard Frame and Mount/Mat Board Sizes
Buying a ready-made frame can save you a ton of cash and if you are an artist it’s the perfect way to make a bigger profit.
This information is very hard to find on the web.
Use the examples below to check these commercial sizes and match the apertures to your print dimensions.
Frames with Aperture sizes
| Frame Sizes | Mat Aperture |
| 12″ x 16″ | 8″ x 12″ |
| 12″ x 16″ | 8.5″ x 11″ |
| 12″ x 16″ | 9″ x 12″ |
| 16″ x 20″ | 8″ x 12″ |
| 16″ x 20″ | 10″ x 12″ |
| 16″ x 20″ | 11″ x 14″ |
| 16″ x 20″ | 12″ x 16″ |
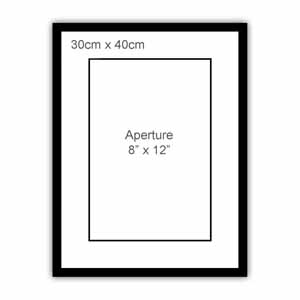
| 30cm x 40cm | 8″ x 12″ |
| 30cm x 40cm | (A4) 297mm x 210mm |
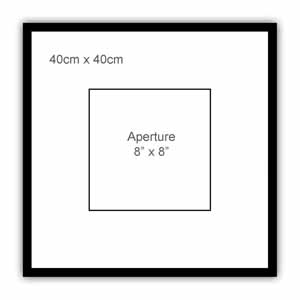
| 40cm x 40cm | 8″ x 8″ |
| 40cm x 40cm | 10″ x 10″ |
| 40cm x 40cm | 30cm x 30cm |
| 40cm x 50cm | 11″ x 14″ |
| 40cm x 50cm | 30cm x 40cm |
| 20″ x 24“ | 16″ x 20″ |
| 24″ x 34″ | 20″ x 30″ |
Standard larger frame sizes with matboard apertures (windows) that fit
| Frame Sizes | Mat Aperture |
| 6″ x 8″ | 6″ x 4″ |
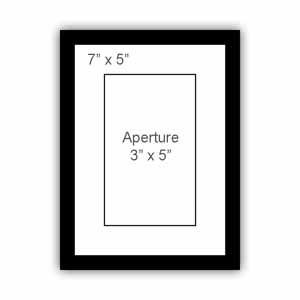
| 7″ x 5″ | 3″ x 5″ |
| 7″ x 5″ | 6″ x 4″ |
| 10″ x 8″ | 3″ x 5″ |
| 10″ x 8″ | 6″ x 4″ |
| 10″ x 8″ | 7″ x 5″ |
| 10″ x 10″ | 8″ x 8″ |
| 10″ x 12″ | 6″ x 4″ |
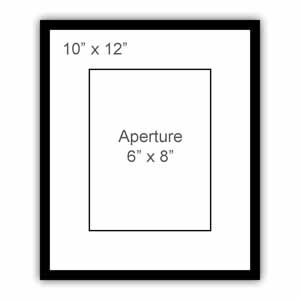
| 10″ x 12″ | 6″ x 8″ |
| 10″ x 12″ | 7″ x 5″ |
| 10″ x 12″ | 10″ x 8″ |
| 11″ x 14″ | 10″ x 8″ |
| 12″ x 16″ | 8″ x 12″ |
| 24cm x 30cm | 6″ x 8″ |
| 30cm x 30cm | 8″ x 8″ |
Standard smaller frame sizes with matboard apertures (windows) that fit
These images will help you to visualize the frames.


This guide will help you save both time and cash. Win-win.

If you found this article useful you may like these too:
- Repair Damaged Drawing Paper – 8 Ways to Rescue Your Artwork
- 9 Ways of Framing on a Budget You Need to Know!
- 10 Easy Ways to Frame Black and White Art
- Where and How to Print Art Prints From Etsy (Downloads / Printables)
- 12 Vintage Bird Illustrations: Watercolor Paintings
- 8 Free Printable Wildlife Paintings by Bruno Liljefors
- How to Start a Printables Business: A Beginner’s Guide
- How to Make Prints of Your Art – Printing Art Explained in Detail
- What Kind of Art Sells Best? All The Secrets Revealed
- What’s the Right Paper for Pencil Drawing? (How to Choose Wisely)
- What Size Art Sells Best? Frames and Apertures – FREE Chart
- Pricing Art For Beginners: Originals, Art Prints, and Formulas
If you are an artist who want s to sell prints, I have a guide for you

NOW PIN THIS


Hi, I’m Kevin Hayler
I’ve been selling my wildlife art and traveling the world for over 20 years, and if that sounds too good to be true, I’ve done it all without social media, art school, or galleries!
I can show you how to do it. You’ll find a wealth of info on my site, about selling art, drawing tips, lifestyle, reviews, travel, my portfolio, and more. Enjoy