
Kevin Hayler: Professional Wildlife artist, author, and traveler.
The basic skills of drawing are easy to learn but difficult to master. In this article, I will explain the fundamentals of drawing in the simplest way I can and try to reassure you that mistakes are an integral part of the drawing process and are experienced by everyone, including professionals.
Basic drawing skills include simplifying shapes, drawing contours, and understanding light and shade. Learning to break down complicated shapes into the simplest forms and rebuilding them, will result in accurate proportions and perspective.
I’ll talk in plain English, with no fancy words or jargon. I hate “art-speak”. This is drawing as I understand it, as a self-taught professional artist with years of experience.
Let’s start.
Disclaimer: When you buy something via my affiliate links I earn from qualifying purchases and sometimes earn a commission, at no extra cost to you. I am an Amazon Associate among others. I only recommend trusted sites.
Understanding Basic Shapes
Drawing involves unseeing what you know and start seeing what’s really there, and you do that by breaking up and stripping down complicated subjects into the simplest shapes possible.
Why Drawing Basic Shapes is Key
Simple shapes are fundamental to the drawing process. Recording the complexity of the world around you is overwhelming unless you learn to see it in another way.
You must learn to recognize the overall shapes and subdivide them into minor shapes, subdivide those, and so on. The detail comes last.
Your aim is to adjust the larger shapes at the beginning of your sketch and realign them until they are balanced and in proportion to each other.
These preliminary lines will determine the course of the whole picture. Time spent on getting the initial proportions right will pay back later when you’re adding detail to an accurate foundation.
Having to correct alignments and proportions at a more advanced stage of a drawing is frustrating, a blow to your confidence, and wastes hours of your time.
Visualizing Basic Shapes
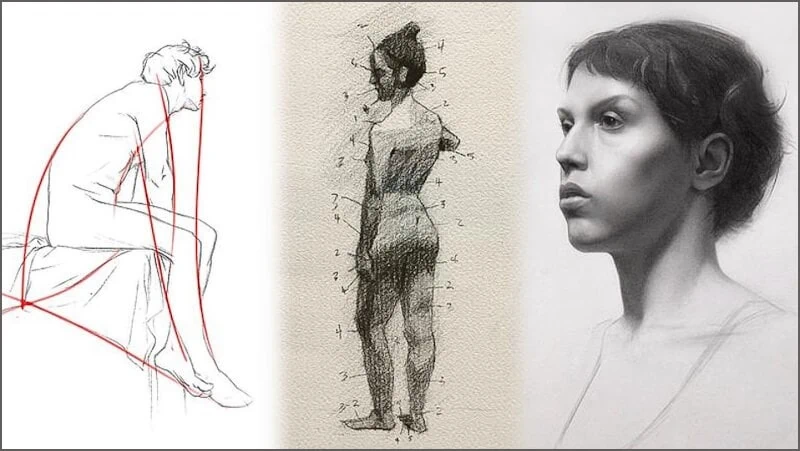
When you look at an object or scene, what do you see? To the untrained eye, it’s a bit of a mess right? That’s why we must look for simpler shapes to make sense of it all. The easiest way to do that is to imagine rectangles, ovals, triangles, or any other super simple shape and record those first.
Stephen is so talented it hurts.
Let him tell you about refining basic shapes.
The most important shapes to record are the ones that stand out straight away. These are your anchor points. If you can be certain that one or two shapes are pretty damned accurate you can compare all the other shapes against them.
Imagine a street scene or cityscape. There are many buildings of different sizes all with a hotch-potch of pitched rooves, chimneys, and windows. You ignore the details and look at the bulk shapes.
It makes much more sense to draw a block of several buildings as a general shape than one a time.
The next block of buildings is penciled in and compared to the first. Is it taller, wider, or shorter? Adjustments can be made until the blocks are aligned, in proportion, and the perspective looks right.
Each shape is broken up into its constituent parts, in this case individual buildings and divided again into doors and windows and so on. That’s how you draw.
Drawing With a Light Touch
These preliminary lines are the scaffold that supports the rest of your drawing. They are experimental lines and are meant to be corrected. Forget any notion that real artists draw the right lines intuitively, it’s not a mystical talent, it’s trial and error.
Put it this way. If you draw 5 straight lines, the chances are high that one of them will be good. When, and if, you rub out the 4 duds, you’ve drawn a perfect line. Job done. Apply that logic to drawing in general, and you can better understand what “talented” artists are doing.
Experienced artists are not afraid of their mistakes, on the contrary, they use the wrong lines to pick out the right ones. Where amateurs go wrong is by assuming that there is much more to it.
They over-complicate the simplicity of the method. They are too concerned with trying to find the secret sauce.
Experienced artists make it look easy, but only because they’ve been drawing for donkeys years. They started in the same way.
It’s important to use light lines and go softly in the first phase of the drawing. Dark lines are difficult to erase and should be avoided.
It is critical not to move on until the fundamental shapes are accurately in place and the proportions have been worked out. It’s also crucial to check that everything is aligned properly.
For example, it’s perfectly possible to draw two beautiful eyes, each one drawn to perfection and to scale, only to notice that one eye is higher than the other! This is a very common mistake.
Don’t get too anxious about your pencil grade. An HB is fine as long as you don’t press too hard.
If pencil grades confuse you read this: What Do Pencil Numbers Mean? Pencil Grades Explained + Charts
Professional artists tend to draw with the paper perpendicular to the eye. Drawing in an upright position will loosen your touch and improve your pencil grip.
Most beginner artists pinch the pencil at the tip. Try holding your pencil further back or even from the far end at an angle and draw using your arm for a more fluid line.
Remember that it’s not always necessary to erase your mistakes. Retaining your lines is a great way of adding a sense of movement to even the dullest of subjects.
Drawing Outlines and Contours
Once you have determined the basic shapes and are happy with the proportions, it’s time to add some solid structure. This means defining the major outlines. These lines are more assured statements but still light enough to be corrected and erased.
Think of the outer contours as silhouetting the subject matter, while the inner lines give the body its substance.
If you need more help with drawing, then I urge you to check out
Dorian Iten on Proko. His course is reasonably priced and inspiring
Draw within the boundaries of your initial shapes and at the same time, change and adjust any minor errors as you notice them. Drawing is all about correcting mistakes.
Remember to draw the shapes within the shapes, divide and subdivide, until you are confident that your contour line is well placed.
These posts are related:
- 7 Types of Contour Drawing Explained: Quick and Easy
- Do You Need to Outline Drawings? Expert Advice From a Pro
It is particularly important to accurately define the focal point of your drawing, and that’s because your viewer will notice any glaring mistakes. You have much more leeway for error at the peripheries of the drawing where your viewer will either, not notice your mistakes at all, or they’ll forgive you.
Your aim is to consolidate your proportions and placements and re-evaluate their alignments. As you outline the prominent features the drawing will begin to gain some depth and three-dimensionality. It’s an evolving puzzle.
Step back occasionally and assess the work. Look at bordering areas, measure, and compare them.
N.B. You’ll notice that correcting one shape will often have a knock-on effect and your correction will require a series of neighboring fixes. So be it, that is why we are only sketching at this stage and making no firm commitments.
Attempting to readjust at a later stage in the drawing when you’ve added detail is a big mistake. It’s very difficult to erase well-drawn areas. you’ll try to save them at all costs and get too precious. This will inhibit your ability to make bolder corrections.
Invest more time in the early stages and your drawing will fall into place.
Adding Detail, Light, and Shade
The next step is to block-in basic tonal values. The idea is to clearly separate light and dark values and shade the darker patches. Don’t concern yourself with nuance and tonal variations, look for the major shapes and shade them lightly.
Some pictures are easier to define than others, it depends on the strength of the light source. Bold, high-contrast subjects are far easier to draw. Nonetheless, the basic principles remain the same. Keep it simple and build upon a base structure.
Let’s say you are drawing a portrait. The shadows are easy to see in strong light, but what if the light is diffused?
First of all, you can see that the hair is a dark value, that can be blocked in, so can the iris and eye socket, nostrils, and underside of the nose and lips. There are always darker patches that can be identified.
Stephen Bauman is a classically trained artist and has a very academic approach to his art. This guy knows his stuff and he’s a very good tutor
The key to getting this right is not to go in too dark too soon. Hold back. Build your darks in layers and lift areas with an eraser.
Hatch an area with even parallel lines or strokes, using the side of your pencil, with an overhand grip. The next layer can be applied with a cross-hatch using the same technique in the opposite direction.
The darks will look even and controlled and because shading this way requires no pressure it’s easy to erase highlights.
It helps to identify the darkest and lightest points in the drawing. Use those two extremes as your tonal reference points. Let’s say you are drawing a portrait, the brightest highlight is probably the sparkle in the eye.
If other areas are equally as bright you might decide to tone them down. The same can be done in reverse with the darker areas.
By now you have an accurate drawing and what follows is more like filling in the spaces.
This post is highly relevant: How to Draw Realistic Shadows in Pencil: Light and Shade
Detail should come last. It’s only when you are 100% sure that everything else is balanced that you can be confident that adding detail will work. Think of it as the icing on the cake.
These fundamental drawing skills will help you to draw in a more practical and methodical way. It doesn’t matter if you are drawing from life or from reference photos, the same approach applies. Mastering the entire process will lay a strong foundation for anything you decide to draw.
About Proportions and Perspective
I haven’t mentioned proportions or perspective for one good reason, they complicate things. Yes, there are rules of perspective but if you are drawing what you see and using the above methods things fall into place naturally.
I’ve never studied perspective or known the “rules” of proportions and I’ve managed to draw pretty well. If a line looks wrong, it’s wrong, so draw another. What is hard about that?
These posts will interest you:
- Do Artists Need a Degree in Art or is it a Waste of Money?
- Are Drawing Books Worth It? Can You Learn From Books?
- Are Online Drawing Courses Worth It? I Chose 5 of The Best
The problem with learning theory and finding the vanishing point and the horizon line is it takes away your ability to see what’s in front of you.
Instead of drawing what you actually see, you start to draw what you know to be there, and they are not the same thing. In real life, there are very few easily identifiable vanishing points, and wasting your time trying to figure them out will drive you mad.
Brent has some great free lessons if you want to check them out. He has a a paid course too if you like his tutorials

Knowing your horizon line is more important than plotting radials. If you’re not drawing buildings, radials won’t help you much anyway.
Knowing where your eye-line rests is the trick. In short, any radial above the eye-line rises, and any below the eye-line lowers. It’s very easy to understand.
Perspective is not just about lead lines, it’s also about tonal values and relative sizes. Objects reduce in size and tonal value as they recede.
As for proportions, they are calculated as you go. If you are working from a reference image you can physically measure one area and compare it to another. No guesswork is involved.
Indeed, if you draw size for size, you can use a pair of dividers to measure between two given points on the photo (or photocopy) and mark those on your paper.
If you are trying to draw from life there’s the traditional way, by using your pencil and thumb.
When you see an artist with an outstretched arm holding up their thumb and pencil, they’re judging the size and relationship of one shape against another. They’re measuring and comparing the proportions or calculating an angle.
Here’s how the pencil and thumb method works:
- Holding Your Pencil: Extend your arm fully, holding a pencil vertically or horizontally. The pencil should be held in line with your line of sight. For accuracy, it’s essential that your arm is fully extended and remains so for each measurement.
- Measuring Angles: When measuring different angles, let’s say, the angle of a building, you can align your pencil with the angle you want to gauge. Hold that position and place the pencil over your paper. This allows you to more accurately replicate the correct angle.
- Measuring Proportions: To measure proportions, use your thumb to mark off the measurement along the pencil shank. For example, you might want to measure the height of a building, use the end of the pencil to mark the rooftop, and your thumb to mark the bottom. You can compare that measurement to the width of the building, to see how they compare. This allows you to maintain the correct ratios in your drawing.
- Negative Space: You can also use this technique to measure negative spaces. These are the spaces around and between a subject. For example, a cup handle is a positive space while the white space or hole in between is a negative space. Recognizing and measuring these spaces makes it easier to find the correct proportions and positioning within the drawing.

Remember, the most important thing is maintaining the same distance between your eye, the pencil, and the subject. Any change will distort the proportions.
As with any skill, practice makes perfect. If it seems difficult at first don’t worry, with a little bit of practice it’ll soon become second nature!
Are you a complete beginner? Try these:
- Can Adults Learn to Draw? Is it Too Late to Start Drawing?
- Can Anyone Learn To Draw? Are Artists Born or Made?
- How Do You Learn To Draw? The Best Drawing Tips
- How to Get Back into Drawing Again After a Long Break
The Dangers of Using Reference Photos
One of the drawbacks of using reference images is information overload. There’s a huge temptation to copy everything we see in the photo, where in fact the drawing would be far more effective with most of the details removed. It’s easier said than done, I have battled with this for years.
When we draw from life our brain filters out superfluous detail and we concentrate on one key area of study. This results in a drawing that has pleasing detail where it matters most, with sketch lines in support.
This is far harder to achieve from a photograph where the background is just as detailed as the foreground and confusing to the eye.
False perspective is another issue often overlooked. Our eyes and the camera lens are not the same thing and many artists make the mistake of thinking the camera doesn’t lie. It does, there is lens distortion. Sometimes it’s obvious, other times not.
I see artists falling into this trap all the time. They draw distorted features or leaning verticals because they fail to see, recognize, or care about what is happening. A good artist can see the errors and correct them when necessary.
Being a slave to a reference photo has another unforeseen drawback. It stifles composition. Artists tend to include elements that would be better removed or placed elsewhere. Let me explain.
Read this post about using photos: Is Drawing From Reference Photos Bad? Are You Cheating?
Let’s say you are drawing a street scene. A camera will capture, the people, street furniture, and vehicles in view.
When it comes to drawing or painting the scene later, you realize that the people are either in the wrong pose, the street signs are ugly, or a car is blocking the view. Removing them leaves a white patch that must be filled. That’s very difficult without more references.
A clever artist will take several photos of every scene from different viewpoints and gather enough information to change the composition later. Few, however, have the foresight and instead, they include all the unwanted elements and produce a poorer piece of art than they envisaged.
The Basics of Drawing: Final Thoughts
To sum up, you’ve learned that drawing is, at its core, about simplifying complex subjects, reducing them into basic shapes, and understanding light and shade.
Drawing is a skill, it’s an art form that can be learned. Yes, some people are more gifted than others but everyone has the capacity to learn and vastly improve their drawing ability. It’s a key skill if you want to learn how to master any of the visual arts
Drawing is the foundation for other art forms.
It’s a process that involves a delicate balance of trial and error, a little practice, patience, and the ability to make mistakes and learn from them. It’s about investing your time in the early stages to avoid the need for major major corrections later on.
And all of this is within reach for next to nothing. All you need is a cheap graphite pencil and a sketch pad and you have enough to make a start.
This is the way I draw. A photorealistic and detailed style, using mainly mechanical pencils and pen erasers

If you like the way I draw and want to know what I use, This is my basic kit

Don’t leave yet, keep scrolling to the end in case you miss something.
This is a shameless plug for my guide. If you want to make a living with your art, as I did for over 20 years, you should seriously consider copying the way I did it.

These posts will help you with your drawing:
- How to Find Your Drawing Style: In 8 Practical Ways
- How to Get Better at Drawing: 16 Tips to Improve FAST
- How to Know When Your Drawing is Finished: Don’t Ruin it!
- How to Make Your Drawings Interesting: 14 Ways to Improve
- How to Plan and Compose Your Art: A Beginners Guide
- How to Scale Up a Drawing in 4 Easy Ways and Save Time
- Is Drawing a Grid Cheating? – Do Real Artists Use Grids?
- Prevent Your Drawings From Smudging: The Ultimate Guide
- Tracing Art – Is It Good or Bad? When Is Tracing Cheating?
Pin For later


Hi, I’m Kevin Hayler
I’ve been selling my wildlife art and traveling the world for over 20 years, and if that sounds too good to be true, I’ve done it all without social media, art school, or galleries!
I can show you how to do it. You’ll find a wealth of info on my site, about selling art, drawing tips, lifestyle, reviews, travel, my portfolio, and more. Enjoy